Why You Need a Bluetooth Proxy

Bluetooth Low Energy is widely used by smart sensors, buttons, and trackers, but many setups hit a hard limit: a single Home Assistant host or USB adapter often cannot see all devices, or cannot maintain stable connections over distance. A Bluetooth proxy solves this by acting as a distributed BLE interface, making Bluetooth integration possible in the first place.
Here’s what a Bluetooth proxy enables:
- Bluetooth where it wasn’t before: Connect devices that your main adapter can’t reach.
- Reliable sensor updates: Avoid dropped readings from Xiaomi, SwitchBot, or other BLE sensors.
- Expanded coverage: Reach multiple rooms or floors without moving your Home Assistant server.
- Presence detection anywhere: Track BLE devices throughout the house.
- Scalable setup: Add more proxies as your smart home grows.
- Fully local and simple: No extra bridges or cloud dependencies, everything runs on your network.
A Bluetooth proxy doesn’t just make your setup more stable – it makes it functional in environments where direct connections would fail. Once you experience the coverage and responsiveness, it becomes a must-have component of any ESPHome-based smart home.
Hardware Requirements
Bluetooth proxy functionality requires an ESP32-class microcontroller. ESP8266 is not supported because it lacks BLE hardware.
Recommended devices:
- ESP32 Dev Kit C
- ESP32 WROOM based boards
- ESP32 S3 for higher performance and memory
- Boards with external antennas for better range
USB to UART bridges like CP2102 or CH340 are fully supported. Power stability is important. Bluetooth scanning is bursty and draws short current peaks. Unstable power or poor USB cables can lead to disconnects or reboots.
Installing the USB to UART Driver (CP2102)
Most ESP32 development boards use a CP2102 USB to UART bridge. On Windows, this driver must be installed manually once.
- Go to the Silicon Labs USB to UART Bridge VCP Drivers download page (https://www.silabs.com/developers/usb-to-uart-bridge-vcp-drivers) and download the Windows driver ZIP CP210x_Universal_Windows_Driver.zip.
- Extract the ZIP archive to a folder you can easily find, e.g.
C:\Drivers\CP210x. - Connect your ESP32 board to the PC with a good USB data cable.
- If the driver isn’t installed, Windows will usually list the device under Other devices with a warning icon.
- Open Device Manager (Win+X → Device Manager) and locate the CP2102 device under Other devices or Unknown devices.
- Right‑click the CP2102 entry and choose Update driver.
- Choose Browse my computer for drivers.
- Then point to the folder where you unzipped the drivers.
- Make sure the option to search subfolders is enabled.
- Windows will then install the CP210x driver files.
- After installation, the device should appear under Ports (COM & LPT) as Silicon Labs CP210x USB to UART Bridge (COMx).
This COM port is later used by ESPHome for flashing.
Network and Infrastructure Considerations
Most ESP32 devices only support 2.4 GHz WiFi. Dual band networks often cause connection issues when 2.4 and 5 GHz share the same SSID.
Recommended setup:
- Dedicated 2.4 GHz SSID or band steering disabled
- WPA2 PSK with AES encryption. No WPA3 or mixed mode
- Channel set to 1, 6 or 11
- Channel width set to 20 MHz
Bluetooth performance depends heavily on RF noise. Avoid placing proxies near USB hubs, metal enclosures or WiFi access points.
ESPHome Configuration Basics
A minimal ESPHome configuration for a Bluetooth proxy looks like this:
esphome:
  name: esp32-bluetooth-proxy-b4b25c
  friendly_name: esp32-bluetooth-proxy-b4b25c

esp32:
  board: az-delivery-devkit-v4
  framework:
    type: esp-idf

...

# Bluetooth scanning is intentionally throttled to reduce RF contention with WiFi.
# The ESP32 uses a single 2.4 GHz radio for both WiFi and BLE, so aggressive BLE scanning
# can starve WiFi and cause disconnects or instability.
# These settings limit scan duty cycle while still allowing reliable BLE discovery.

esp32_ble_tracker:
  scan_parameters:
    active: true
    interval: 1100ms
    window: 1100ms

bluetooth_proxy:
  active: true
This configuration enables active BLE scanning and exposes the proxy automatically to Home Assistant.
interval= how often scanning starts (320 ms)window= how long the scan runs each interval (30 ms)
Bluetooth Proxy Operation Modes
ESPHome supports two scanning modes:
- Passive mode listens only to advertisements and has minimal impact on BLE devices.
- Active mode can initiate connections and is required for some sensors. It uses more power and airtime but offers broader compatibility.
- For most smart home sensors, active mode is recommended.
Performance and Stability Notes
In real world deployments, a single ESP32 proxy reliably covers two to three rooms depending on building materials.
Best practices:
- One proxy per floor
- Avoid placing near WiFi access points
- Avoid USB power from routers or TVs
- Use short, shielded USB cables
ESP32 devices can run for months without reboot when powered cleanly.
With this configuration, BLE discovery is reliable, WiFi remains stable, and you avoid the common shared-radio issues on ESP32.
HAdding an ESPHome Device to Home Assistant Using IP and Encryption Key
Once your ESP32 is flashed with ESPHome firmware and connected to the network, it must be added to Home Assistant before features like the Bluetooth Proxy become available. This process is fully manual and uses the device IP address together with the API encryption key.
Prerequisites
Before you start, make sure the following conditions are met:
- The ESP32 is powered on and connected to the same network as Home Assistant
- You know the device IP address
- You have access to the
api.encryption.keyfrom your ESPHome YAML configuration
Example:
api:
  encryption:
    key: "ABCDEF1234567890..."
Adding the ESPHome Device to Home Assistant
- Open Home Assistant and navigate to: Settings → Devices & Services → ESPHome
- When prompted, choose Enter IP address and enter the IP of your ESP32 device. Confirm and continue.
- Home Assistant will now ask for the encryption key. Paste the key exactly as defined in your ESPHome configuration and confirm.
If the connection is successful, the device will appear under the ESPHome integration and show as online.
Verifying the Bluetooth Proxy
Once the device is added, Home Assistant automatically registers it as a Bluetooth Proxy if the following is present in your ESPHome configuration:
esp32_ble_tracker:
  scan_parameters:
    active: true

bluetooth_proxy: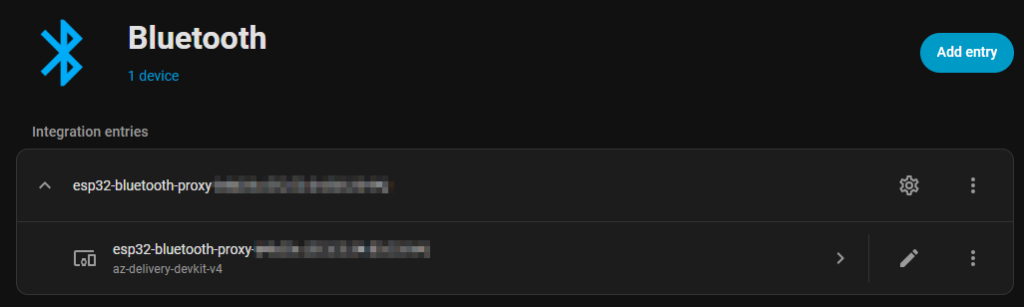
active: true- To verify this, go to: Settings → Devices & Services → Bluetooth
- You should see an entry indicating that a Bluetooth proxy is available and online.
- At this point, Home Assistant can route Bluetooth traffic through the ESP32 automatically.
Notes and Common Pitfalls
- The message “No unconfigured Bluetooth adapters found” is expected if no local USB Bluetooth adapter is present. It does not indicate an error when using ESPHome proxies.
- Bluetooth devices will only appear once they actively broadcast. Some sensors require a button press or wake-up event.
- No manual pairing is required for supported Bluetooth integrations.
3D Printable Case for the NodeMCU ESP32 S Dev Kit
I have also created a custom 3D printable case specifically designed for the NodeMCU ESP32 S Dev Kit with overall dimensions of 54 × 25 × 15 mm.
The case includes an integrated PCB support strip that securely holds the board in place without screws or additional tools. Precise cutouts provide easy access to the USB port and allow mounting an SMA antenna connector. For thermal management, the enclosure features hexagonal ventilation slots that improve airflow while maintaining structural stability.
The design is optimized for PLA printing, offering a snug fit, clean tolerances, and straightforward assembly. It is intended to be practical, minimal, and robust for everyday ESP32 projects.
The model is available here:
https://www.printables.com/model/1578730-esp32-case-with-sma-antenna-mount
Result
Once the ESP32 is added via IP and encryption key, Bluetooth devices can be discovered and managed centrally by Home Assistant without any additional configuration.
This setup allows you to deploy multiple Bluetooth proxies and extend BLE coverage across your home seamlessly.