When working with Proxmox LXC or VM containers, it’s prudent to take a snapshot before applying updates. Snapshots provide an instant rollback point if the update causes failures.
Complete Tutorial Series: Automating Updates & Snapshots with Ansible and Proxmox
Dive into this three-part series that shows you how to safely automate updates while keeping your Proxmox environment under control. Step by step, you’ll learn how to handle updates with Ansible, create snapshots before making changes, and keep an eye on your snapshot inventory with automated reports.
🔧 Automated Updates with Ansible
📸 Create Proxmox Snapshots before Updates
📊 Monitor and Report Proxmox Snapshots
Introduction

When it comes to automating snapshots in Proxmox, many ready-made solutions look convenient at first glance. But in practice, they often introduce unnecessary complexity:
- You need to manually enter VM or LXC IDs instead of using something intuitive like the hostname.
- You must explicitly define the Proxmox node within a cluster, even though this information is already available to the system.
- You end up depending on external Python libraries like proxmoxer or on CLI wrappers that need to be installed and maintained on every host.
With a native Ansible role built directly on the Proxmox API, these obstacles disappear. The role automatically determines the correct ID from the hostname and resolves the node internally. No manual input, no extra software, no cluster-specific hacks. Just your Ansible playbooks and the native Proxmox API.
A simpler approach with Ansible
Creating a Snapshot via Proxmox GUI:
- Log in to the Proxmox web interface.
- Navigate to the container or VM you want to protect.
- Click Snapshots in the left-hand menu.
- Click Take Snapshot.
- Provide a descriptive name like
pre_update_YYYYMMDD_HHMMand optional comment. - Click Take Snapshot to create the point-in-time backup.
This snapshot can be restored instantly if an update breaks the container. It doesn’t have to be this complicated. With a native Ansible role built directly on the Proxmox API, these obstacles disappear. The role automatically determines the correct ID from the hostname and resolves the node internally.
Creating a custom Proxmox role for Ansible (GUI)
For automation, it’s best to create a dedicated role with minimal permissions instead of using a full admin account. We’ll call this role CRAnsible.
Step 1: Create the Role
- Log in to the Proxmox web interface.
- Navigate to Datacenter → Permissions → Roles.
- Click Add.
- Name the role:
CRAnsible. - Select the privileges needed:
VM.Snapshot– create, list, and restore snapshotsVM.Audit– view VM/container configuration and stateSys.Audit– view system-wide status, needed for API queries on nodes and LXC containersVM.PowerMgmt– needed if you want to start, stop, or reboot VMs/LXCs via the API
- Click Add to create the role.

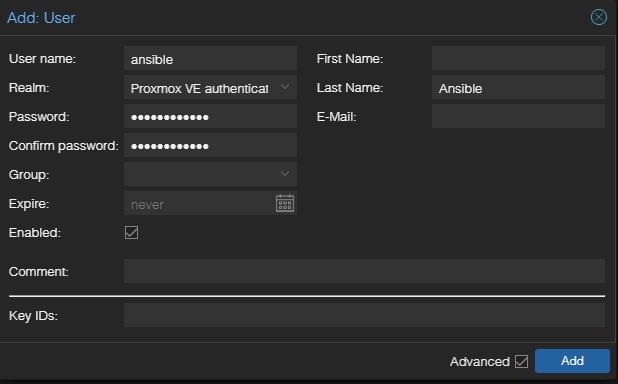
Step 2: Create a dedicated user
- Go to Datacenter → Permissions → Users → Add.
- Enter a username, e.g.,
ansible@pve. - Set a secure password or create an API token.
Step 3: Create a dedicated user
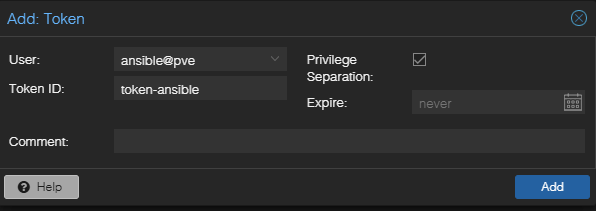
Security Note: When using the GUI, you can create either a user with a password or a user with an API token for automation. Using an API token is generally safer, because it can be limited in scope, easily revoked, and avoids exposing your main password.
- To create an API token in the GUI:
- Go to Datacenter → Permissions → API Tokens.
- Select your automation user (e.g.,
ansible@pve). - Click API Tokens → Add.
- Give it a name e.g.
Token ID: token-ansibleand optional expiration date. - Use the generated token in Ansible for authentication.
Important: Make sure to record the API token secret immediately, as it will only be displayed once and cannot be retrieved later.
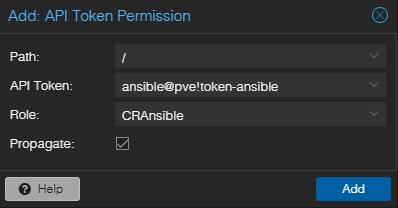
Step 4: Assign the Role to the API Token
Navigate to Datacenter → Permissions → Add → API Token Permission.
- Select Path:
/(or limit it to a specific node or container if desired) - Select User:
ansible@pve - Select API Token: your newly created token
- Assign Role:
CRAnsible - Confirm with Add to apply the permission
Optional CLI Setup
Note: In the CLI, role assignments must be explicitly applied via ACLs, unlike in the GUI where the assignment is automatic.
You can also create the user via the Proxmox CLI:
# Step 1: Create the custom role CRAnsible
pveum roleadd CRAnsible -privs "VM.Snapshot VM.Audit Sys.Audit VM.PowerMgmt"

# Step 2: Create the automation user
# Realm 'pve' is the default, you can also use 'pam' if needed.
pveum useradd ansible@pve -comment "Ansible automation user"

# Step 3: Create an API token for the automation user
# This will output the token ID and secret (the secret is shown only once!)
pveum usertoken add ansible@pve token-ansible --comment "API token for Ansible automation"

# Step 4: Assign the role to the API token
# Here we give cluster-wide rights (path '/'). Adjust if you want to restrict to a node or VM.
pveum aclmod / -user ansible@pve!token-ansible -role CRAnsible
Now Ansible can authenticate using ansible@pve with either a password or an API token, and create snapshots before performing updates.
Testing Proxmox API Access from the command line
https://pve.proxmox.com/wiki/Proxmox_VE_API
To quickly check if your Proxmox host and API token are working, use curl from your Ansible host:
curl -k -s \
  -H 'Authorization: PVEAPIToken=YOUR_TOKEN' \
https://YOUR_PROXMOX_HOST:8006/api2/json/nodes-kignores self-signed SSL certificates.-senables silent mode, suppressing progress and extra info so only the raw output (e.g., JSON) is displayed.- Replace
YOUR_TOKENwith your API token (user@realm!tokenid=secret) andYOUR_PROXMOX_HOSTwith the Proxmox hostname or IP.- Username: ansible
- Realm: pve
- Token ID: token-ansible
- Token Secret: 12345678-ABCD-1234-ABCD-1234567890AB
- So
YOUR_TOKENshould be replaced with:ansible@pve!token-ansible=12345678-ABCD-1234-ABCD-1234567890AB
If successful, you’ll get a JSON listing of all nodes in the cluster. Without jq installed the output will appear in a single compact line rather than pretty-printed JSON.
{
  "data": [
    {"node": "pve01", "status": "online"},
    {"node": "pve02", "status": "online"}
  ]
}
This confirms that the API is reachable and you can query nodes, VMs, and containers in your playbooks.
Running an Ansible task for Proxmox API calls
When working with Proxmox in an Ansible playbook, it’s important to ensure that API calls are executed from a host that has network access to the Proxmox cluster. Typically, this is the Ansible control machine, not the managed hosts. The following example demonstrates a clean way to test the Proxmox API using the uri module with delegation.
- name: Test Proxmox API via uri from control host
  ansible.builtin.uri:
    url: "https://{{ dnf_update_proxmox_host }}:8006/api2/json/nodes"
    method: GET
    headers:
      Authorization: 'PVEAPIToken={{ dnf_update_proxmox_api_token }}'
    validate_certs: no
    timeout: 60
  delegate_to: localhost
  run_once: true
  register: uri_connection_test

- name: Show Proxmox API response
  ansible.builtin.debug:
    var: uri_connection_test.json
Key Points
validate_certs: no
Skips SSL verification. This is convenient when using Proxmox with self-signed certificates, but for production a valid certificate should be preferred.
delegate_to: localhost
Runs the task on the Ansible control machine (the host where you run Ansible), not on the managed hosts. This ensures that the API call is executed in an environment that can reliably reach the Proxmox API.
run_once: true
Ensures the API is queried only once, even if the play targets multiple hosts.
Why
delegate_tois crucial for Proxmox API callsBy default, Ansible tasks run on the managed hosts. For Proxmox API calls, this means each task attempts to reach the Proxmox API from the managed host itself. In practice, this often fails because the managed host might not have network access to the Proxmox cluster, DNS resolution may not work, or port 8006 could be blocked.
Using
delegate_to: localhostforces the task to run on the Ansible control machine – the host with full access to the Proxmox API. This avoids network issues, eliminates timeouts, and ensures tasks execute reliably. It is also more efficient: tasks like querying nodes or creating snapshots only need to run once, not on every host.In short: without delegation, you risk failed or hanging tasks.
delegate_toensures API calls are executed in the correct environment, making it an essential technique when managed hosts cannot directly reach central services.
🛠️ Troubleshooting Proxmox API Access
Sometimes API calls to Proxmox via Ansible do not behave as expected. Press here to expand and see common issues, background, and solutions.
Bash interprets ! in the token
bash: !tokenid=...: event not foundFix: Wrap the Authorization header in single quotes '…':
-H 'Authorization: PVEAPIToken=ansible@pve!tokenid=SECRET'Proxmox reports invalid token
HTTP/1.1 401 no tokenid specifiedCause: The token format is incomplete or missing the secret. Proxmox requires:
USER@REALM!TOKENID=SECRET- USER@REALM → e.g.,
ansible@pve - TOKENID → the name of your token
- SECRET → the generated token secret
Example working request:
curl -k -s \
  -H 'Authorization: PVEAPIToken=ansible@pve!automation=12345678-ABCD-1234-ABCD-1234567890AB' \
  https://pve01.examplecorp.io:8006/api2/json/nodes
Debugging tip
If no JSON is returned, add -v to see HTTP status and headers:
curl -k -v \
  -H 'Authorization: PVEAPIToken=ansible@pve!token-ansible=12345678-ABCD-1234-ABCD-1234567890AB' \
  https://pve01.examplecorp.io:8006/api2/json/nodes
This will clarify whether the problem is with authentication, token format, or connectivity.
- If you get this or that:
{"data":null,"message":"Permission check failed (/nodes/pve03, Sys.Audit)"}{"data":[]}it means your API user lacks the required permissions.
Tasks Returning Empty Data Due to Permissions
Error:
QEMU VMs: []
LXC containers: []
Background:
- Even with correct Node names, the API may return empty results if the token lacks sufficient permissions.
- For QEMU,
VM.Auditis required; for LXC,Sys.AuditorVM.Auditwith LXC access is needed.
Solution:
Once permissions are correct, tasks will return all existing resources.
Ensure the API token has the required privileges for both QEMU and LXC.
Test API access directly using curl with the token.
Core Features of the ansible-proxmox-snapshot Automation
- Pre-update snapshots for Proxmox QEMU VMs and LXC containers
- Automatic target resolution based on
inventory_hostname - Direct API integration — no additional host-side scripts required
- Supports snapshot rotation and retention (if configured in the role)
- Role-level configuration via
defaults/main.ymlorgroup_vars - Fully idempotent and safe to run multiple times
Summary
By combining Ansible automation with Proxmox snapshots, you achieve:
- Safe and repeatable DNF updates.
- Service state verification.
- Detailed reporting.
- A rollback mechanism for containers.
This workflow is especially useful for home labs, test environments, or production clusters, ensuring updates don’t introduce downtime or configuration drift.