During an ESPHome project for my aquarium, I noticed that several D1 Mini (ESP8266) boards suddenly refused to accept firmware uploads. The reset button still responded, but uploads consistently failed.
After testing with five of these units, I find a method to reliably bring them back to life. This guide explains the procedure in a clear, step-by-step manner for anyone encountering the same problem.
Important: This guide applies only to ESP8266-based boards, such as the D1 Mini. It will not work with Arduino Uno, Nano, Mega 2560, or other non-ESP8266 boards.
Step 1: Preliminary Checks
Before attempting any repair, ensure the following:
- USB cable: Must support data transfer; charging-only cables will fail.
- COM port detection: Open Windows Device Manager → Ports (COM). Look for a CH340 or CP2102 device.
- Drivers: Ensure they are installed and up-to-date.
Rationale: Flashing requires stable serial communication. Without proper detection, uploads cannot succeed.
| Symptom | Likely Cause | Action | Technical Rationale |
|---|---|---|---|
| Upload fails immediately | Not in bootloader | Retry GPIO0→GND + Reset | Bootloader only active if GPIO0 low at reset |
| Board not visible | Cable/driver | Replace cable, reinstall driver | Upload requires enumerated COM port |
| Upload stalls | Insufficient power | Use powered hub / short cable | MCU resets mid-upload if voltage dips |
| Sketch runs incorrectly | Corrupted flash | Erase + reflash | Corrupted flash may prevent MCU from booting valid sketch |
Step 2: Understand Reset vs. Flash erase
- Reset button: Restarts the MCU but does not clear the flash memory.
- Flash erase: Clears firmware, partitions, and any corrupted data. This step is required when uploads consistently fail.
Rationale: The ESP8266 does not have a factory reset. Corrupted flash or invalid boot flags can block normal firmware uploads.
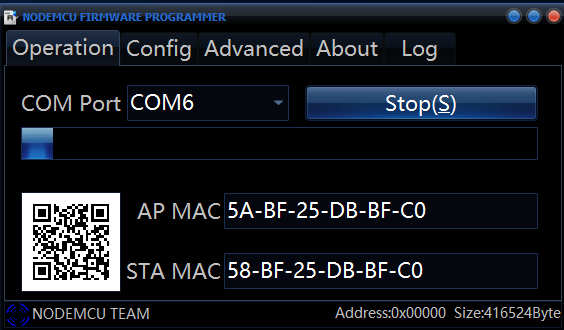
Step 3: Using NodeMCU Flasher
The NodeMCU Flasher (Windows) can be used to manually erase the flash and restore upload capability:
NodeMCU Flasher GitHub
To navigate into this directory on Windows, open a Command Prompt and run flasher by executing:
nodemcu-flasher-master\Win64\Release\ESP8266Flasher.exeProcedure:
- Connect the D1 Mini via USB.
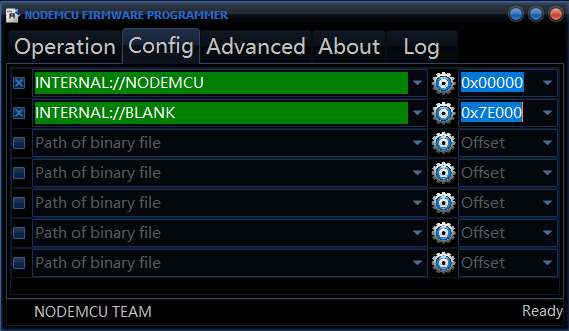
- Open NodeMCU Flasher → Config tab.
- Add a new entry:
- Checkbox: Don’t forget to
enable the leading checkbox - Path:
INTERNAL://BLANK - Address:
0x7E000(check the box!)
- Checkbox: Don’t forget to
- Switch to Operation → Start flashing.
This process resets the flash memory, clearing corrupted firmware or partitions that may prevent uploads.
Tip: The flasher normally detects the ESP8266 within a few seconds. If the log remains at “Begin find ESP8266” and the onboard LED continues blinking, the board is not entering flash mode correctly.
Note:Detect serial port changed.
Note:Auto MAP serial port.Port-->COM6
Note:Serial port connected.
Note:Begin find ESP8266.
Step 4: Enter Bootloader Mode
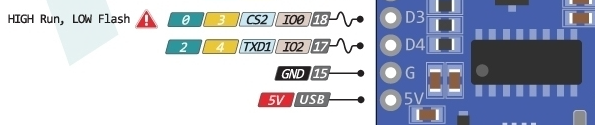
On D1 Mini boards, the silkscreen D-number corresponds to GPIO pins. D3 = GPIO 0, which must be pulled LOW (connected to GND) during reset to enter bootloader mode.
Which Pin Is GPIO 0 on the D1 Mini?
- On the D1 Mini boards, the D-number on the silkscreen corresponds to specific ESP8266 GPIO pins.
- D3 is actually GPIO 0—the pin you need to pull LOW (to GND) during reset to put the board into flash/bootloader mode.
Procedure:
- Connect GPIO 0 (D3) → GND using a jumper wire or the Flash button if available.
- Press and release Reset.
- Release GPIO 0.
The ESP8266 checks GPIO0 at boot:
- Low → bootloader mode (ready for firmware upload)
- High → run existing firmware
Once in bootloader mode, proceed with the NodeMCU Flasher upload.
Step 5: Retry Flashing
With the board in bootloader mode, repeat the flashing process using NodeMCU Flasher. The firmware should upload successfully.
Tip: Keep GPIO 0 connected to GND during the initial flash attempt if using a jumper wire. If using a dedicated Flash button, follow its normal procedure.
Step 6: Verify Success
After flashing:
- Disconnect the board from GND.
- Reset the board once.
- Test by uploading a simple sketch via the PlattformIO, Arduino IDE or ESPHome.
- The board should now respond and accept uploads normally.
Using this method, most previously unresponsive D1 Mini units can be fully restored. It’s rewarding to bring these microcontrollers back to life and put them straight into action for automation and sensor setups with ESPHome.