When I started automating my aquarium in June 2022, my goal was simple: monitor temperature, control the lighting, and manage the water pump intelligently. Initially, I considered a traditional Arduino setup using VSCode with the PlatformIO extension. But even this small project required hundreds of lines of code, juggling libraries, headers, and constant recompilation.
Then I discovered ESPHome. What would have taken hundreds of lines of Arduino code could now be done in under 100 lines, with clear YAML configuration and almost no boilerplate.
ESPHome doesn’t require Home Assistant. While it integrates seamlessly with Home Assistant, you can use ESPHome devices completely standalone. All sensors and switches work out of the box, and you can update firmware via USB or OTA. If you prefer, ESPHome can also communicate over MQTT to other platforms like Node-RED or OpenHAB. Home Assistant makes management easier, but it’s not mandatory – you can get started and fully control your devices without it.
The ESPHome Advantage
ESPHome makes IoT device automation simple, maintainable, and robust:
- Readable YAML configuration: Devices, sensors, and automations are declared clearly and intuitively.
- Initial USB setup: First firmware upload is done via USB on a Windows PC, no drivers required, with Home Assistant open in the browser.
- OTA updates: After initial setup, firmware updates are deployed wirelessly.
- Live log debugging: Monitor device logs wirelessly or via USB, making troubleshooting fast and flexible.
- Failover Wi-Fi: ESPHome remembers multiple networks and reconnects automatically.
- Integration-ready: Works seamlessly with Home Assistant and MQTT.
For my aquarium, this meant I could configure temperature thresholds, automate LED lighting schedules, and control pumps in minutes rather than hours. Every change was instantly testable, without worrying about compilation errors.
Step-by-Step Setup
- Connect ESP to USB and open Home Assistant in a browser.
- Create YAML configuration for sensors, switches, and Wi-Fi.
- Initial upload via USB to flash firmware.
- Enable OTA updates for future wireless firmware changes.
- Monitor live logs either wirelessly or via USB.
This workflow minimizes hardware hassle and accelerates development.
Real-World Example: Aquarium Project
For those interested in the hardware details, including wiring diagrams, GPIO assignments, and photos of the setup, all relevant information is still available in the archived GitHub repository: https://github.com/filipnet/aquarium. This archive provides a thorough reference for anyone looking to replicate or understand the physical setup of the project.
Comparison
The difference between the two approaches is clear:
- Arduino Code: ~420 lines, ~12,000 characters
- ESPHome YAML: ~80 lines, ~1,200 characters
Maintaining the Arduino project was time-consuming and often felt like a waste of time. ESPHome achieves the same functionality with far less code, easier maintenance, and faster iteration. For this reason, I’m no longer continuing the Arduino version on GitHub.
Breaking Down ESPHome Configurations into Segments
To make ESPHome more approachable and easier to understand, we’ll break the configuration into individual segments. Each YAML snippet represents a specific part of your device setup, such as Wi-Fi, sensors, or switches.
These segments are designed to be modular: you can follow along step by step, and in the end, combine them into a single, complete configuration file. This approach helps you understand each component separately before seeing how they work together in the full setup.
By the time you finish all the segments, you’ll have a complete ESPHome YAML file ready to deploy to your device, with a clear understanding of each part.
Click here: If you are already familiar with ESPHome and want the full code in one block.
esphome:
  name: esp8266-d1261d
  friendly_name: esp8266-d1261d
  on_boot:
    priority: -10
    then:
      - logger.log: "Waiting 60s before activating sensors..."
      - delay: 60s
      - component.update: ds18b20_sensor
      - component.update: bme280_sensor

esp8266:
  board: d1_mini

# Enable logging
logger:

# Enable Home Assistant API
api:
  encryption:
    key: "1234567abcdefg1234567abcdefg12"

ota:
  - platform: esphome
    password: "abcdefg1234567abcdefg1234567ab"

wifi:
  ssid: !secret wifi_ssid
  password: !secret wifi_password
  use_address: 192.168.1.12

  # Enable fallback hotspot (captive portal) in case wifi connection fails
  ap:
    ssid: "Esp8266-D1261D Fallback Hotspot"
    password: "1234567abcdefg1234567abcdefg12"

captive_portal:

time:
  - platform: sntp
    id: time_ntp
    timezone: Europe/Berlin
    servers: 192.168.1.1

mqtt:
  broker: "mqtt.example.com"
  username: "esp8266-d1261d"
  password: "abcdefg1234567abcdefg1234567ab"

switch:
  - platform: gpio
    pin: D5
    name: "Aquarium Nightlight"
    id: relay_1
    restore_mode: RESTORE_DEFAULT_OFF
    icon: "mdi:weather-night"

  - platform: gpio
    pin: D6
    name: "Aquarium Daylight"
    id: relay_2
    restore_mode: RESTORE_DEFAULT_OFF
    icon: "mdi:weather-sunny"

  - platform: gpio
    pin: D3
    name: "Aquarium Airpump"
    id: relay_3
    restore_mode: RESTORE_DEFAULT_OFF
    icon: "mdi:air-filter"

  - platform: gpio
    pin: D0
    name: "Aquarium Filter"
    id: relay_4F
    restore_mode: RESTORE_DEFAULT_OFF
    icon: "mdi:filter"

# BME280 I²C Sensor for ambient
i2c:
  sda: D2
  scl: D1
  scan: true

# 1-Wire Bus for DS18B20
one_wire:
  - platform: gpio
    pin: D7
    id: one_wire_bus

sensor:
  - platform: wifi_signal
    name: "Wi-Fi Signal Strength"
    icon: "mdi:wifi"
    update_interval: 60s

  - platform: uptime
    name: "System Uptime"
    icon: "mdi:clock-outline"
    update_interval: 30s

  - platform: dallas_temp
    one_wire_id: one_wire_bus
    name: "Aquarium Water Temperature"
    id: ds18b20_sensor
    update_interval: 60s

  - platform: bme280_i2c
    address: 0x76
    id: bme280_sensor
    update_interval: 30s
    temperature:
      id: bme280_temperature
      name: "Ambient Air Temperature"
      oversampling: 16x
      icon: "mdi:thermometer"
    pressure:
      id: bme280_pressure
      name: "Ambient Air Pressure"
      icon: "mdi:gauge"
    humidity:
      id: bme280_humidity
      name: "Ambient Air Humidity"
icon: "mdi:water-percent"- Note: Any sensitive data, such as passwords or API keys, have been pseudonymized (replaced with placeholders) for security and privacy reasons.
- Note on Hostnames: I prefer using generic hostnames for IoT devices rather than task-specific names like
aquarium_sensor. Devices often get repurposed over time, and keeping a flexible, neutral hostname makes it easier to reassign them without confusion or conflicts in the network.
ESPHome Basic Setup with Optional Sensor Delay
Note: When initially setting up the device via the Home Assistant frontend, some values (like encryption keys, passwords, or other generated settings) are automatically created. Do not change these, or the device may fail to connect or update.
esphome:
  name: esp8266-d1261d
  friendly_name: esp8266-d1261d
  on_boot:
    priority: -10
    then:
      - logger.log: "Waiting 60s before activating sensors..."
      - delay: 60s
      - component.update: ds18b20_sensor
      - component.update: bme280_sensor

esp8266:
  board: d1_mini

# Enable logging
logger:

# Enable Home Assistant API
api:
  encryption:
    key: "1234567abcdefg1234567abcdefg12"
Segments explained:
esphome:→ Sets the device name and friendly name.on_boot:→ Optional: waits 60s after boot before activating sensors to prevent boot-time errors.esp8266:→ Specifies the board type (D1 Mini).logger:→ Enables logging for debugging.api:→ Connects the device to Home Assistant with encryption.on_boot:→ Optional (the blue marked parts): waits 60s after boot before activating sensors to prevent boot-time errors
Over-the-Air Updates (OTA)
ota:
  - platform: esphome
    password: "abcdefg1234567abcdefg1234567ab"
Segment explained:
ota:→ Enables over-the-air updates, so you can upload new firmware wirelessly.password:→ Protects the OTA process
Wi-Fi Configuration with Fallback Hotspot
wifi:
  ssid: !secret wifi_ssid
  password: !secret wifi_password
  use_address: 192.168.1.12

  # Enable fallback hotspot (captive portal) in case wifi connection fails
  ap:
    ssid: "Esp8266-D1261D Fallback Hotspot"
    password: "1234567abcdefg1234567abcdefg12"

captive_portal:
NOTE: Home Assistant’s ESPHome Builder includes a “Secrets” feature, allowing you to centrally and securely store variables for individual or multiple projects. This is useful for credentials such as Wi‑Fi (as see !secret above), MQTT broker, or interface keys, which can then be accessed within your JSON configurations.
Segment explained:
ssid&password→ Connects the device to your main Wi-Fi.use_address→ Assigns a fixed IP so the backend (Home Assistant) can reliably access the ESPHome device.- Note: If you initially use DHCP, the device will get an IP automatically; you can then update
use_addresswith the assigned IP for consistent access.
- Note: If you initially use DHCP, the device will get an IP automatically; you can then update
ap:→ Configures a fallback hotspot (captive portal) that activates if the main Wi-Fi connection fails.
Time Synchronization (NTP)
time:
  - platform: sntp
    id: time_ntp
    timezone: Europe/Berlin
    servers: 192.168.1.1
Segment explained:
platform: sntp→ Uses the Simple Network Time Protocol to keep the ESPHome device clock accurate.id: time_ntp→ Identifier for this time component; can be referenced by other components if needed.timezone→ Sets the device’s timezone (here, Europe/Berlin).servers→ Specifies the NTP server to sync with; can be local (like a Home Assistant instance) or public NTP servers.
Tip: Having accurate time is important for logs, automations, and scheduled tasks.
Optional: MQTT Integration
mqtt:
  broker: "mqtt.example.com"
  username: "esp8266-d1261d"
  password: "abcdefg1234567abcdefg1234567ab"
Segment explained:
broker→ The address of your MQTT server.username&password→ Credentials to connect with values.- Optional: You only need this if you want the ESPHome device to communicate over MQTT instead of (or in addition to) the Home Assistant API.
Note: Up to this point, the code can be reused for almost any other ESPHome project – you only need to adjust the relevant variables. Everything that follows covers sensors and project-specific details.
Relay Control (Switches)
switch:
  - platform: gpio
    pin: D5
    name: "Aquarium Nightlight"
    id: relay_1
    restore_mode: RESTORE_DEFAULT_OFF
    icon: "mdi:weather-night"

  - platform: gpio
    pin: D6
    name: "Aquarium Daylight"
    id: relay_2
    restore_mode: RESTORE_DEFAULT_OFF
    icon: "mdi:weather-sunny"

  - platform: gpio
    pin: D3
    name: "Aquarium Airpump"
    id: relay_3
    restore_mode: RESTORE_DEFAULT_OFF
    icon: "mdi:air-filter"

  - platform: gpio
    pin: D0
    name: "Aquarium Filter"
    id: relay_4F
    restore_mode: RESTORE_DEFAULT_OFF
    icon: "mdi:filter"
Segment explained:
platform: gpio→ Uses GPIO pins to control physical relays.pin:→ The GPIO pin connected to each relay.name:→ Friendly name for Home Assistant interface.id:→ Internal identifier for automations or scripts.restore_mode: RESTORE_DEFAULT_OFF→ Ensures the relay is off on boot by default.icon:→ Optional icon for UI display.
Tip: Even though the example uses aquarium-related names, consider using generic names for IoT devices so they can be repurposed easily later.
Sensor Setup
# BME280 I²C Sensor for ambient
i2c:
  sda: D2
  scl: D1
  scan: true

# 1-Wire Bus for DS18B20
one_wire:
  - platform: gpio
    pin: D7
    id: one_wire_bus

sensor:
  - platform: wifi_signal
    name: "Wi-Fi Signal Strength"
    icon: "mdi:wifi"
    update_interval: 60s

  - platform: uptime
    name: "System Uptime"
    icon: "mdi:clock-outline"
    update_interval: 30s

  - platform: dallas_temp
    one_wire_id: one_wire_bus
    name: "Aquarium Water Temperature"
    id: ds18b20_sensor
    update_interval: 60s

  - platform: bme280_i2c
    address: 0x76
    id: bme280_sensor
    update_interval: 30s
    temperature:
      id: bme280_temperature
      name: "Ambient Air Temperature"
      oversampling: 16x
      icon: "mdi:thermometer"
    pressure:
      id: bme280_pressure
      name: "Ambient Air Pressure"
      icon: "mdi:gauge"
    humidity:
      id: bme280_humidity
      name: "Ambient Air Humidity"
      icon: "mdi:water-percent"
Segment explained:
i2c:→ Defines the I²C bus for sensors like BME280; must be declared before the sensor itself.one_wire:→ Defines the 1-Wire bus for DS18B20 temperature sensors; also must be declared first.sensor:→ Declares all sensors connected to the device.wifi_signal→ Monitors Wi-Fi strength.uptime→ Tracks system uptime.dallas_temp→ Reads water temperature from DS18B20 sensors on the defined 1-Wire bus.bme280_i2c→ Measures ambient temperature, humidity, and pressure via the BME280 on the I²C bus.
Tip: Always define the bus (i2c or one_wire) before the sensors that use it, otherwise ESPHome will throw an error.
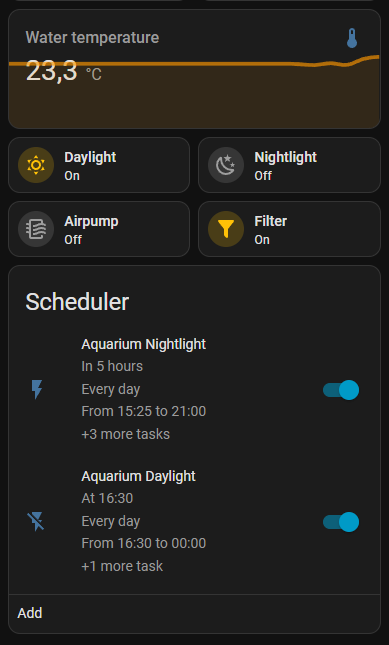
Aquarium Scheduler (Home Assistant)
In Home Assistant, you can schedule aquarium devices like lights and the air pump. For example, the daylight relay turns on in the morning and off in the evening, while the air pump cycles throughout the day. These automations are easy to adjust via the UI and can interact with sensor data for smarter control, all without modifying the ESPHome YAML.
In Home Assistant, I utilize the Scheduler Component. This custom integration allows me to create time-based schedules for controlling devices such as aquarium lights and pumps. Paired with the Scheduler Card, it provides an intuitive interface within the Lovelace dashboard, enabling me to manage and adjust schedules effortlessly.
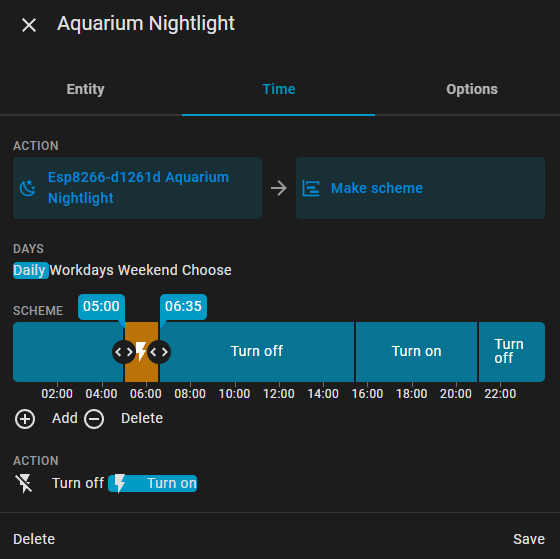
Click here: For example, this is how I configured the day and night light with the scheduler.
| Entity | Action | Start | Stop |
|---|---|---|---|
| Daylight | – | – | 6:30 |
| Daylight | on | 6:30 | 16:30 |
| Daylight | off | 16:30 | – |
| Nightlight | – | – | 5:00 |
| Nightlight | on | 5:00 | 6:35 |
| Nightlight | off | 6:35 | 15:25 |
| Nightlight | on | 15:25 | 21:00 |
| Nightlight | off | 21:00 | – |
Lessons Learned
When converting my ESP8266 aquarium controller code to ESPHome YAML, I ran into several challenges:
- YAML indentation issues: Even a single misplaced space could break the configuration, especially with nested components like the BME280 sub-sensors.
- Boot failures with connected sensors: The ESP wouldn’t start if the I²C BME280 or 1-Wire DS18B20 sensors were connected.
- Relay restore mode conflicts: Setting a relay to
restore_default_oncaused startup problems due to duplicate GPIO initialization on boot. - Startup delays for sensors: Attempting to introduce a delay before reading sensor values didn’t work as expected in ESPHome.
- In ESPHome, all component IDs are case-sensitive, so
DS18B20_sensorandds18b20_sensorare treated as different; always match the ID exactly as defined to avoid configuration errors. - Interestingly, ESPHome won’t start with a faulty power supply (3.4 V instead of 5 V), whereas the Arduino code still runs; replacing the power supply fixed the ESPHome startup issue.
- Keep a backup of your YAML before changes.
- Name sensors and switches clearly for Home Assistant dashboards.
After completing the configuration, I flashed a new D1 Mini and replaced the old one on the board. Once the new board was installed, everything worked perfectly. ESPHome turned my modest aquarium automation project into a reliable, easy-to-manage smart device, reducing complexity while enhancing functionality.
I’m glad I initially started with C++ and PlatformIO, which helped me develop my programming skills, but everything has its time. With YAML and ESPHome, I now spend less time wrestling with code and more time exploring other exciting IT topics.
A quick follow-up
just a few days after I published the article, Home Assistant released a new update of ESPHome. As shown below, it’s remarkably easy to flash the Arduino with a fresh firmware — including all updated libraries — over a pure wireless connection. Fast, simple, effective.

Useful Resources
- ESPHome Official Documentation: https://esphome.io
- Home Assistant Integration with ESPHome: https://www.home-assistant.io/integrations/esphome/