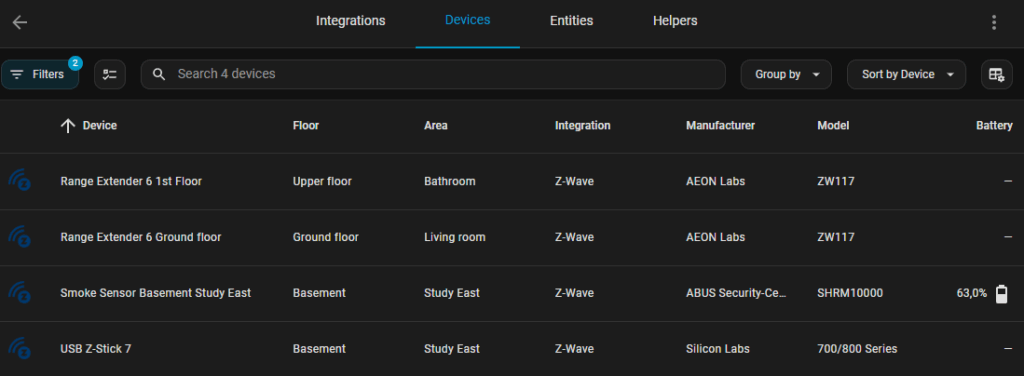
Managing a home Z-Wave network can become challenging when devices or gateways are unreliable. In this setup, 12 ABUS Z-Wave smoke detectors were originally controlled by a single ABUS gateway. Over time, the gateway became inconsistent.

This article explores replacing the ABUS gateway with Home Assistant using an Aeotec Z-Stick 7, along with range extenders, to achieve a more stable and reliable Z-Wave network. We will go through the current setup, the planned Home Assistant setup, and the reasoning behind the changes.
Current Setup
| Manufacturer | Product | Part Number | Notes |
|---|---|---|---|
| ABUS | Z-Wave Smoke Detector | SHRM10000 | 12 units installed |
| ABUS | Z-Wave Gateway | SHGW10000 | Original gateway controlling smoke detectors |
Situation
The ABUS Gateway has become unreliable. Notifications often fail to reach the user, and some devices are intermittently unreachable even though the gateway is centrally located. Attempts to extend the Z-Wave network with ABUS extenders failed — the gateway detects the devices but cannot communicate with them properly.
Experience with the ABUS Z-Wave Smart Plug (SHHA10000)
I had purchased the ABUS Z-Wave Smart Plug (model SHHA10000) to expand my existing Z-Wave network. However, immediately after plugging in both units, I noticed a high-frequency humming sound coming from each device. After contacting ABUS support, I was informed that this noise is normal behavior for the product. Since I do not use or tolerate any devices in my home that emit high-frequency signals, this response did not inspire confidence. As a result, I decided to return both plugs unused to the seller.
Experience with the Aeotec Range Extender 7 on the ABUS Gateway
I initially had a good impression of Aeotec products. The Aeotec Range Extender 7 integrated smoothly into the ABUS Z-Wave Gateway and was immediately recognized as a range extender. The ABUS smoke detectors also appeared to route their connections through the Aeotec devices — the paths were displayed correctly. However, they consistently showed a “poor” signal quality, and all test alarms failed to trigger, even after several days of operation. After consulting Aeotec’s very helpful support team, it became clear that the ABUS implementation did not properly support this setup. Consequently, I decided to return the devices as well.
Planned Home Assistant Setup
| Manufacturer | Product | Part Number | Notes |
|---|---|---|---|
| Aeotec | Z-Stick 7 (Z-Wave Plus V2) | ZWA010 | Primary Z-Wave controller for Home Assistant |
| Ugreen | USB A to USB A Cable, 2 m, USB 3.0 | N/A | Connects Z-Stick to server |
| Aeotec | Range Extender 6 | ZW117-C15 (868,42 MHz) | Two units for extending Z-Wave coverage |
💡 Note: The Aeotec Range Extender 6 has since been replaced by the 7 series. I purchased two used units via Kleinanzeigen.de at a very low price. Since the ABUS smoke detectors do not support Z-Wave Long Range and are my only Z-Wave devices, this choice made the most sense.
Plan
Replace the ABUS gateway with Home Assistant using the Aeotec Z-Stick 7 as the primary controller. The Z-Stick will connect to the server via a 2-meter Ugreen USB A–A cable. Two Aeotec Range Extender 6 units will help improve network coverage and ensure that all smoke detectors remain reliably reachable.
The goal is to have a stable Z-Wave network fully managed by Home Assistant, with reliable notifications and better control over devices, while avoiding the limitations of the original ABUS ecosystem.
Connecting the Z-Wave Controller to a Proxmox Virtual Machine
Running Home Assistant inside a virtualized environment like Proxmox offers flexibility and easy backups, but it also requires correct USB passthrough configuration so the Aeotec Z-Stick 7 is properly recognized inside the Home Assistant VM.
Identify the USB Device
Connect the Aeotec Z-Stick 7 to your Proxmox host using the Ugreen USB A–A cable (2 m, USB 3.0).
Then check if the host detects it:
lsusbYou should see something like:
Bus 002 Device 001: ID 1d6b:0003 Linux Foundation 3.0 root hub
Bus 001 Device 001: ID 1d6b:0002 Linux Foundation 2.0 root hub
Bus 001 Device 002: ID 10c4:ea60 Silicon Labs CP210x UART Bridge
Note the vendor ID (10c4) and product ID (ea60) to confirm the correct device.
Attach the USB Device via the Proxmox Web Interface
- Open the Proxmox Web UI.
- Select the virtual machine running Home Assistant.
- Go to Hardware → Add → USB Device.
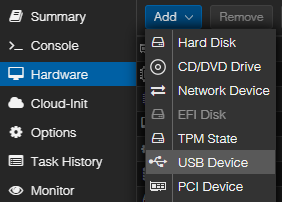
- Select the entry matching the Aeotec Z-Stick 7 (verify by vendor/product ID).
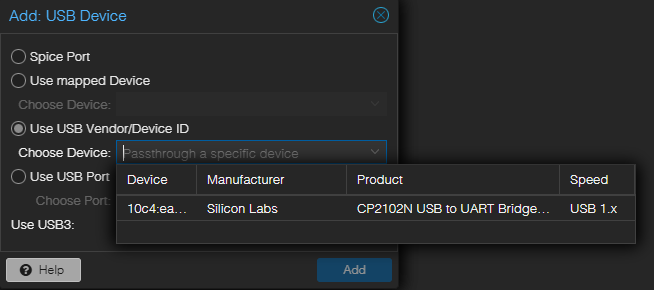
- Click Add to attach the Z-Stick.

- Restart the VM to activate the USB passthrough.
Verify USB Detection in Home Assistant
Once the VM is running, open the Home Assistant terminal or connect via SSH:
ls /dev/serial/by-id/You should see a device entry like:
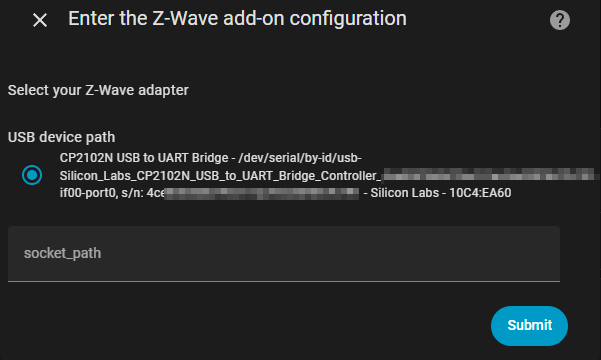
usb-Silicon_Labs_CP2102N_USB_to_UART_Bridge_Controller_4cef711a0c020c92f605f0d5173e106f-if00-port0 # anonymizedUse this path (/dev/serial/by-id/...) in your Z-Wave integration setup inside Home Assistant.
Installing Z-Wave in Home Assistant
Once the Aeotec Z-Stick 7 is successfully connected to your Home Assistant virtual machine, the next step is to install and configure the Z-Wave integration. Home Assistant uses Z-Wave JS UI, which provides both a backend service and a web interface for managing your Z-Wave network.
Add the Z-Wave JS UI Add-on
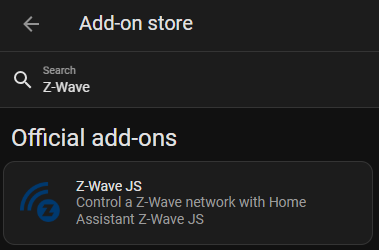
- Open Settings → Add-ons → Add-on Store in Home Assistant.
- Search for Z-Wave JS UI and install it.
- After installation, open the Configuration tab of the add-on.
- Under Network, select your Z-Stick (usually
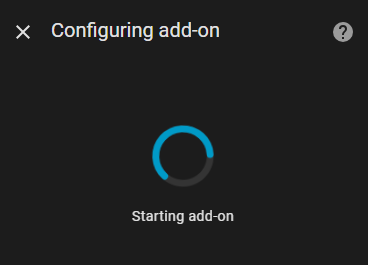
/dev/serial/by-id/...). - Save the configuration and start the add-on.
- Optionally enable Start on boot and Watchdog for reliability.
Verify the Connection
After the add-on starts, open its Web UI (button: Open Web UI).
You should see your Z-Wave controller listed as Connected with details such as firmware version and controller ID.
If not, double-check:
- The serial port path is correct.
- The VM has exclusive access to the USB stick.
- The Z-Stick is not claimed by another process.
Integrate Z-Wave JS with Home Assistant
The Z-Wave integration allows you to control a Z-Wave network from Home Assistant via the Z-Wave JS driver.
- Go to Settings → Devices & Services → Add Integration.
- Search for Z-Wave.
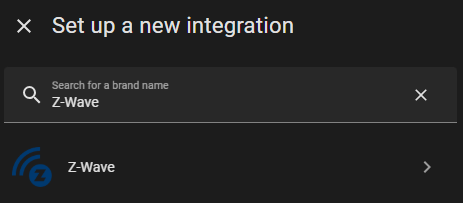
- Choose Recommended installation (it will automatically detect the running service).
- Press Submit and wait some time
- Confirm the Device name – Home Assistant will now communicate directly with Z-Wave JS UI.

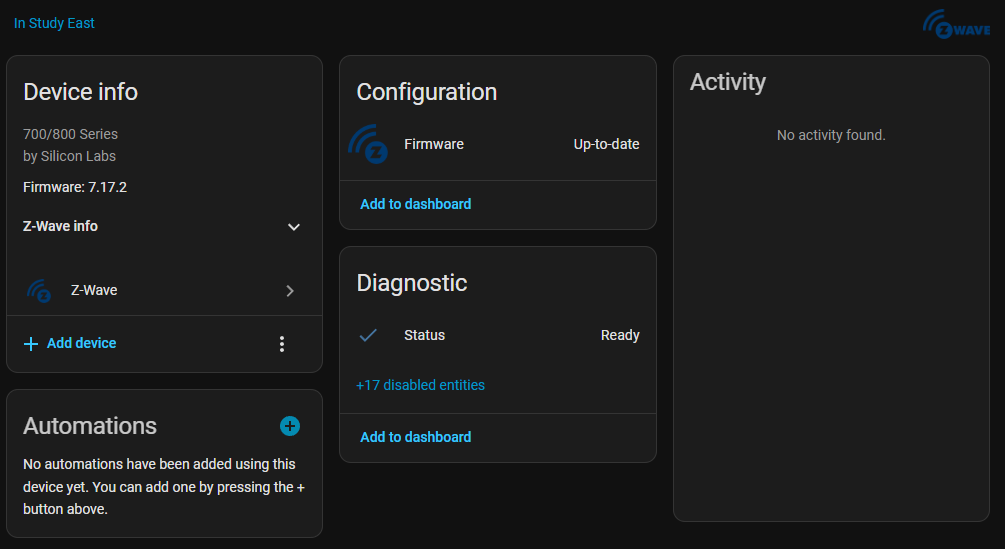
Once connected, you will see the controller listed as a device under Devices & Services → Z-Wave.
Notes for First Startup
- The initial startup may take a few minutes as the network initializes.
- When first adding devices, perform inclusion close to the Z-Stick to ensure stable pairing.
- Avoid starting multiple Z-Wave add-ons at once; only Z-Wave JS UI should be running.
- Network topology, signal strength, and routing will improve automatically over time as the mesh stabilizes.
Including and Managing Z-Wave Devices
With the Z-Wave JS UI add-on running and connected to your Aeotec Z-Stick 7, you can now begin adding your ABUS Z-Wave smoke detectors to the new network. Each detector must be excluded from the old ABUS gateway before it can join the new Home Assistant setup.
Prepare the Devices
- Make sure the old ABUS Gateway (SHGW10000) is powered off or factory-reset, so it doesn’t interfere.
- Keep the Z-Stick close to the first smoke detector for the initial inclusion.
- Check the battery level of each ABUS Smoke Detector (SHRM10000) to avoid connection issues.
Exclude the Devices (Optional but Recommended)
Even if the devices were reset, performing an exclusion ensures clean pairing.
In the Z-Wave JS UI Web UI:
- Open the Actions menu and select Remove Device.
- On the smoke detector, press and hold the pairing button until the LED flashes (refer to ABUS manual).
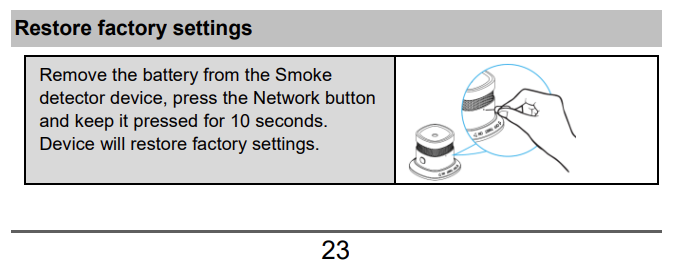
- The interface will confirm that a node was successfully removed.
Include the Smoke Detectors in Home Assistant
💡 Note: When setting up Z-Wave networks, initial pairing of all devices — especially smoke detectors — should be done without any range extenders present. Extenders should only be added after all end devices have been successfully paired to ensure stable routing and proper network mapping.
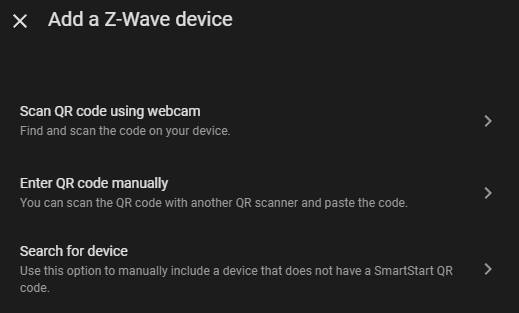
- In Home Assistant (Z-Wave JS UI), start Add Device (Inclusion).
- Choose the third option Search for device
- In the next Searching for device dialog press the Advanced security options button
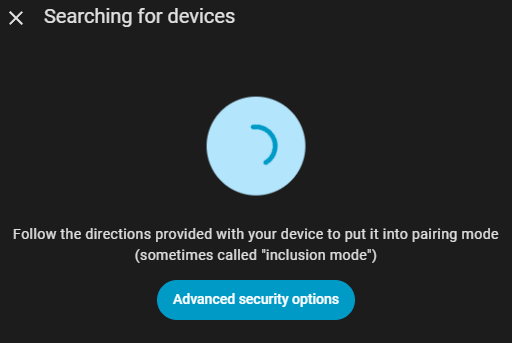
- Since the ABUS SHRM10000 smoke detectors support S2 encryption, select Secure if possible and confirm this with Search for device.
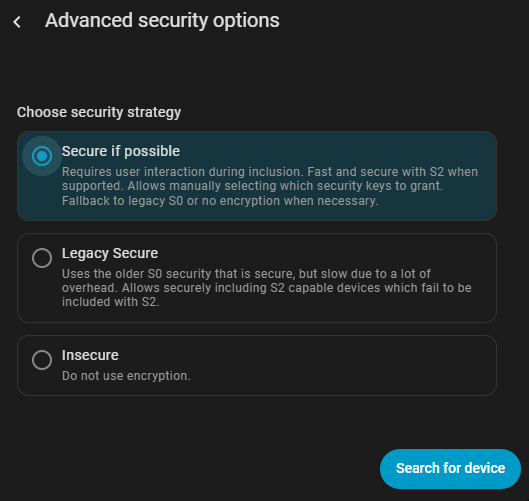
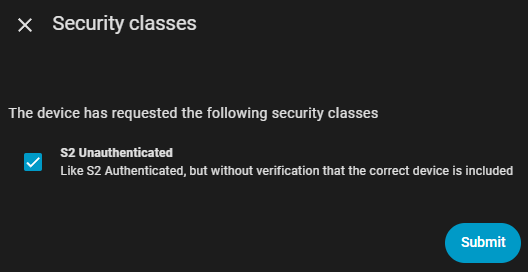
- The previous Searching for devices dialogue box reappears, but this time without the blue button and with a note stating Inclusion strategy: Secure if possible.
- Press the network button three times within 1.5 seconds – LED flashes three times.
- Keep the detector close to the controller during pairing; extenders should be added later.
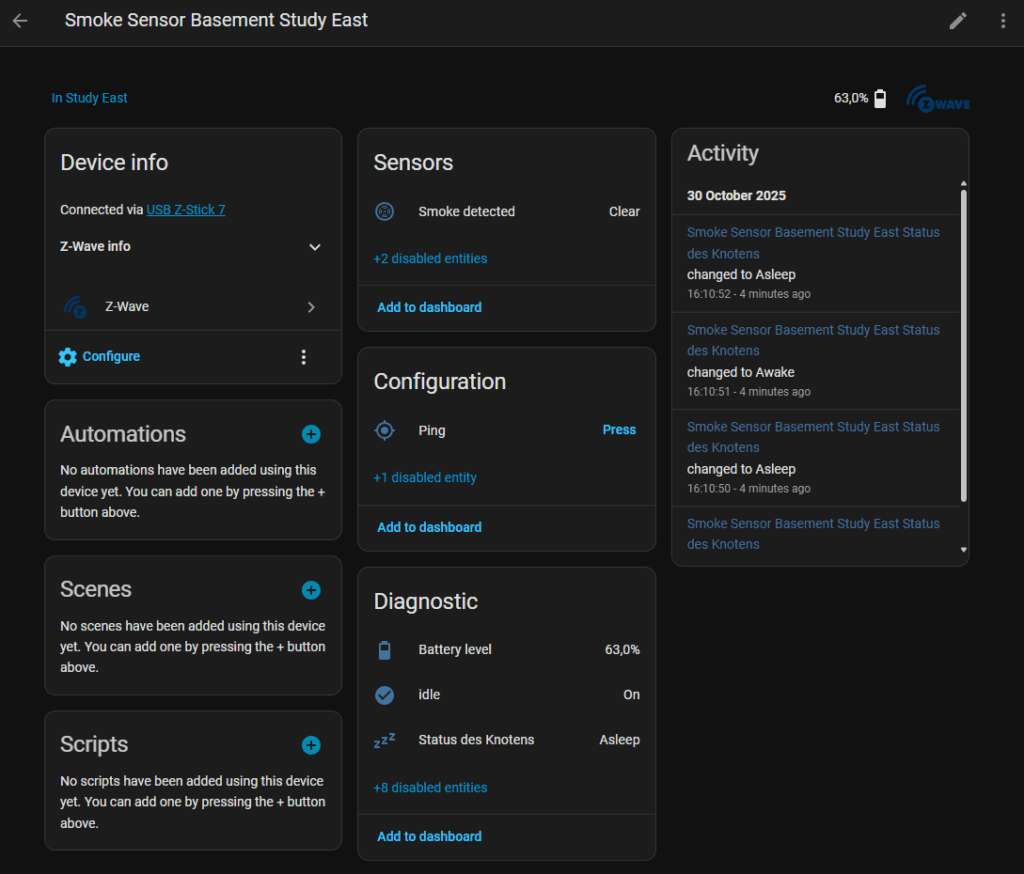
- Give the Smart Smoke sensor a name like Smoke Sensor Basement Study East
- After successful inclusion, wait until all entities (battery, smoke state) appear – may take a few minutes due to battery wake-up intervals.
Repeat for all detectors – ideally moving the Z-Stick or the VM host temporarily closer to each one during pairing to ensure a clean initial setup.
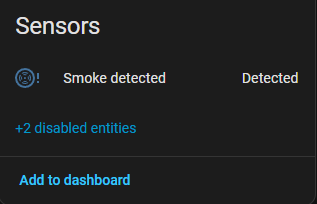
First test
When performing a test on the smoke detector, pressing the test button should cause the Smoke detected sensor state to change to Detected. This behavior confirms that the alarm signal is properly recognized by the system during a manual test, even though no real smoke is present. It ensures that the detector and the monitoring platform are correctly communicating and that the alert mechanism will function in an actual emergency.
Verify Node Interviews
After inclusion, each device undergoes an “interview” process, where it reports its capabilities and parameters.
In the Z-Wave JS UI, check that each node shows Status: Complete.
If any remain incomplete:
- Wake up the device manually (press the test/pair button briefly).
- Wait a few seconds for the process to finish.
- Optionally restart the Z-Wave JS UI add-on to refresh node information.
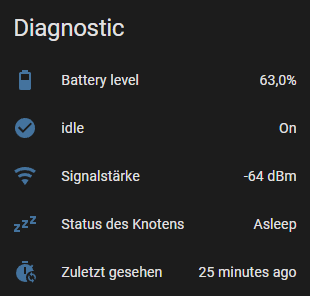
Adding Additional Entities
Home Assistant creates multiple entities per device, some of which are disabled by default. Enabling certain ones can be very useful, especially in the Diagnostics section:
- Signal Strength – monitors connectivity quality.
- Last Seen – shows when the device last communicated.
- Idle Smoke Alarm Sensor – indicates when the smoke detector is in a clear/idle state versus Detected
Activate them via Settings → Devices & Services → [Device] → Entities. Once enabled, they can be used for dashboards, notifications, or automations to better track device health.
Optimize the Mesh Network
Once all devices are included:
- Place the Aeotec Range Extender 6 units strategically between your Z-Stick and the farthest smoke detectors.
- In Z-Wave JS UI press the Gear symbol
- Open Network → Network → Diagnostics
- Press Rebuild network routes to rebuild optimal routing paths.
- Wait until all nodes have reported new neighbors (this can take several hours).
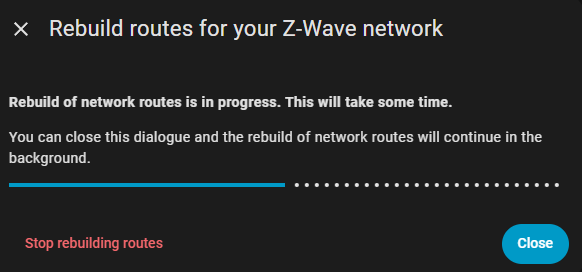
Stable routing ensures all smoke detectors remain reachable and can send alerts or battery reports reliably.
Monitoring and Maintenance
- Review the network map in Z-Wave JS UI → Network Graph to visualize connections.
- Periodically trigger a Smoke Detector Test on a few devices to verify communication.
- Keep firmware up to date if Z-Wave JS UI offers updates for your controller.
- Replace batteries proactively when levels drop below 80%.
ABUS SHWM Water Leak Sensor
A compact Z-Wave water leak sensor that detects leaks and flooding early, helping prevent damage in your home. It integrates seamlessly with Z-Wave networks and can be added alongside other sensors like smoke detectors for a complete home safety setup.
Resetting the ABUS SHWM10000
To perform a full factory reset:
- Remove the battery.
- Press and hold the tamper button.
- While holding it, insert the battery again.
- Keep holding the tamper button for several seconds until the LED flashes.
- Release the button — the device is now reset and ready for inclusion.
This clears all previous pairing data, ensuring a clean start.
Adding the ABUS SHWM10000 to Home Assistant
Prerequisite: Home Assistant with Z-Wave JS integration.
Steps:
- Open
Settings → Devices & Services → Z-Wave JS → Add Device - On the sensor, press the tamper button three times quickly (within 1.5 seconds).
- The LED flashes three times → the device is now in inclusion mode.
- Home Assistant should detect it as a Water Leak Sensor.
If it does not appear:
- Run Z-Wave Exclude in Home Assistant.
- Press the tamper button three times again to remove old pairing.
- Repeat the inclusion process.
Writing Automations in Home Assistant
When designing automations in Home Assistant, it’s generally a good practice to minimize the total number of automations to reduce complexity and make the system easier to maintain. However, in security-related scenarios, I have deliberately chosen a different approach: for each specific use case, I created a dedicated automation. This helps limit potential errors and makes each automation easier to understand, debug, and test independently.
- Smoke Alarm
- Smoke Sensor Low Battery Alarm
- Smoke Alarm Canceled
- Smoke Detector Offline Warning

Of course, this is a personal design decision and not a strict rule – how you structure your automations is ultimately up to you. I also want to emphasize that I cannot provide any warranty or guarantee for the safety or correctness of these setups. Every user is fully responsible for their own implementation and actions when working with security-relevant automations.
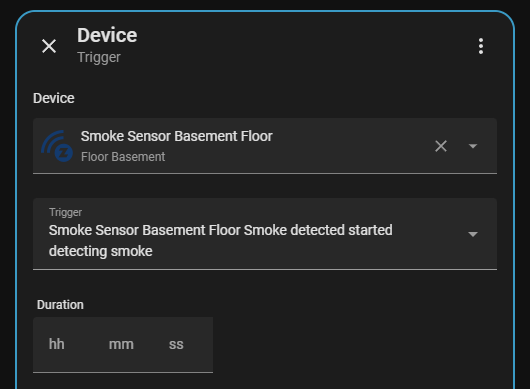
For the trigger, I implemented device triggers and included all of my smoke detectors in the setup. This ensures that the automation will respond individually to each detector, keeping the logic clear and focused on each specific device.
For the action, I defined a clear and isolated response that is executed whenever the trigger fires. This keeps the behavior predictable and ensures that each smoke detector activation leads to the same, consistent reaction.
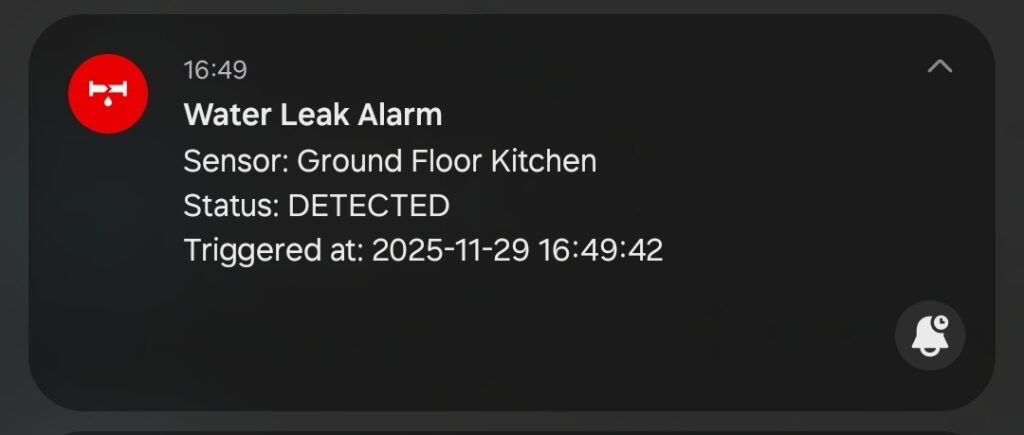
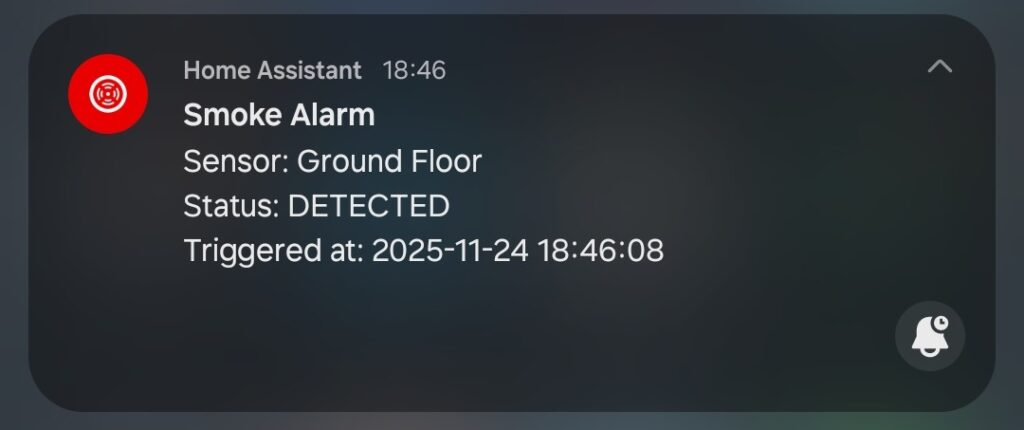
For better traceability, I decided to use both a persistent notification and a push notification as the action. The persistent message ensures that the event can be reviewed later inside Home Assistant, while the push notification is delivered immediately to a dedicated channel on my mobile devices with a distinct alert sound. This makes the notification noticeable and reliably surfaces the event even when the phone is in another room.
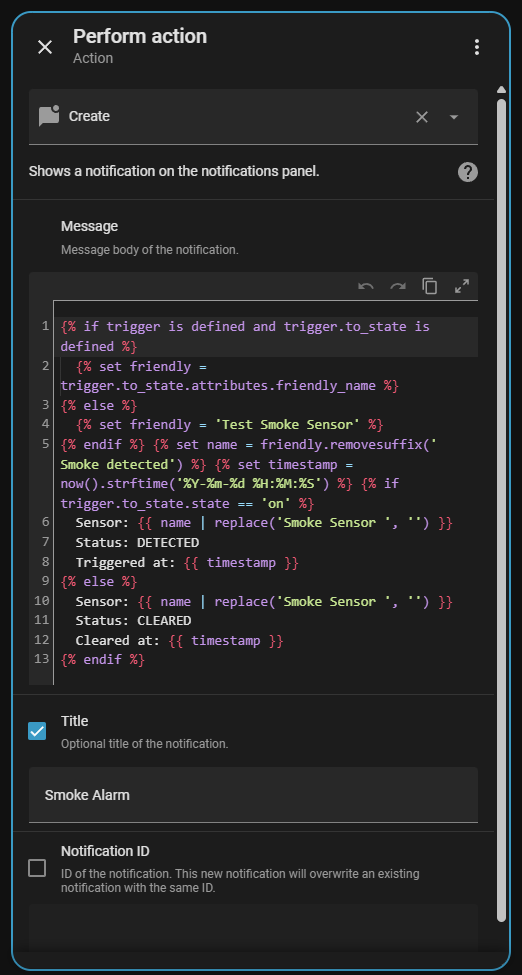
🖋️ Here is an example of how it could look. Click here to view the code.
alias: Smoke Alarm
description: Trigger a critical alert for any smoke detector
triggers:
- type: smoke
device_id: <device_id_1>
entity_id: <entity_id_1>
domain: binary_sensor
trigger: device
- type: smoke
device_id: <device_id_2>
entity_id: <entity_id_2>
domain: binary_sensor
trigger: device
- type: smoke
device_id: <device_id_3>
entity_id: <entity_id_3>
domain: binary_sensor
trigger: device
conditions: []
actions:
- action: persistent_notification.create
data:
title: Smoke Alarm
message: >-
{% if trigger is defined and trigger.to_state is defined %}
{% set friendly = trigger.to_state.attributes.friendly_name %}
{% else %}
{% set friendly = 'Test Smoke Sensor' %}
{% endif %}
{% set name = friendly.removesuffix(' Smoke detected') %}
{% set timestamp = now().strftime('%Y-%m-%d %H:%M:%S') %}
{% if trigger.to_state.state == 'on' %}
Sensor: {{ name | replace('Smoke Sensor ', '') }}
Status: DETECTED
Triggered at: {{ timestamp }}
{% else %}
Sensor: {{ name | replace('Smoke Sensor ', '') }}
Status: CLEARED
Cleared at: {{ timestamp }}
{% endif %}
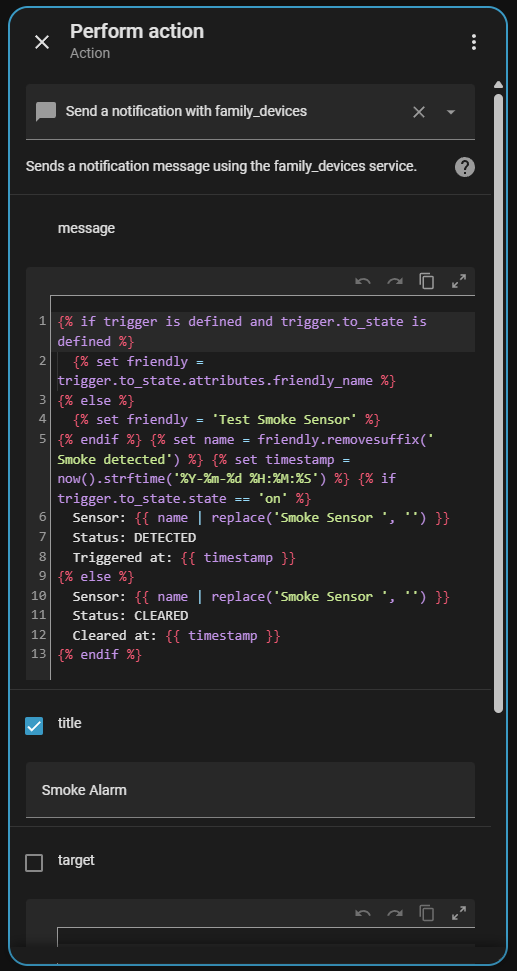
- action: notify.family_devices
data:
title: Smoke Alarm
message: >-
{% if trigger is defined and trigger.to_state is defined %}
{% set friendly = trigger.to_state.attributes.friendly_name %}
{% else %}
{% set friendly = 'Test Smoke Sensor' %}
{% endif %}
{% set name = friendly.removesuffix(' Smoke detected') %}
{% set timestamp = now().strftime('%Y-%m-%d %H:%M:%S') %}
{% if trigger.to_state.state == 'on' %}
Sensor: {{ name | replace('Smoke Sensor ', '') }}
Status: DETECTED
Triggered at: {{ timestamp }}
{% else %}
Sensor: {{ name | replace('Smoke Sensor ', '') }}
Status: CLEARED
Cleared at: {{ timestamp }}
{% endif %}
data:
channel: Smoke Alarm
importance: high
ttl: 0
priority: high
notification_icon: mdi:smoke-detector-variant
color: red
mode: singleTesting and Verifying Notifications
After including all ABUS Z-Wave smoke detectors and ensuring a stable mesh network, the final step is to verify that Home Assistant reliably receives alarms and can notify you immediately.
Configure Notifications
- Open Settings → Automations → Add Automation in Home Assistant.
- Create a new automation triggered by Device → Smoke Detector → Alarm Triggered.
- Choose the action type:
- Mobile App Notification: Sends an instant push notification.
- Email: Optional fallback for alerting multiple recipients.
- Other Integrations: e.g., MQTT or webhooks for external systems.
Test Each Smoke Detector
- Physically test each smoke detector using the test button (short press).
- Verify that Home Assistant logs the event and triggers the automation.
- Check that the notification reaches all intended devices or services.
Monitor Device Health
- Periodically review Z-Wave JS UI → Devices for battery levels, last seen status, and communication reports.
- Run Network Heal after moving detectors or adding range extenders.
- Keep an eye on Node Status: if any show as unreachable, check routing or battery.
Optional: Logging and Alerts
- Enable logging in Home Assistant for Z-Wave events to track alarms historically.
- Configure a dashboard card for your smoke detectors, showing current status and battery levels.
- This provides quick visual confirmation that the system is healthy and ready to alert in case of smoke.
Result & Stability
By replacing the unreliable ABUS gateway with Home Assistant and an Aeotec Z-Stick 7, the Z-Wave network becomes stable and predictable. All smoke detectors communicate reliably, and notifications are handled entirely through Home Assistant automations. The Aeotec Range Extender 6 units improve network coverage and ensure every device stays connected. You now have complete transparency over device status, battery levels, and alarm events — all from one interface. In practice, this setup turns a previously fragile ABUS system into a robust, self-managed Z-Wave network that runs quietly and consistently in the background.
References
- ABUS Z-Wave Smoke Detector SHRM10000 and Gateway SHGW10000 – Official Product Page: https://www.abus.com/
- Aeotec Z-Stick 7 (ZWA010) – Official Product Page: https://aeotec.com/z-wave-usb-stick/
- Aeotec Range Extender 6 (ZW160) – Official Product Page: https://aeotec.com/z-wave-range-extender/
- Home Assistant Z-Wave JS Documentation – https://www.home-assistant.io/integrations/zwave_js/
- Proxmox USB Passthrough Guide – https://pve.proxmox.com/wiki/USB_Passthrough