Before buying a Mitsubishi Heavy Industries (MHI) split AC, I explored the WF‑RAC (Smart M‑Air) Wi-Fi module to ensure full local control through Home Assistant. The goal: manage the AC directly over the local network without touching the device or relying on the cloud.

Understanding the WF‑RAC module
A big thank you to jeatheak for providing the Mitsubishi WF-RAC integration – it enables straightforward Home Assistant connectivity for these air conditioning units and is a real benefit for the community. Great work!
The WF‑RAC is a small Wi-Fi adapter for compatible MHI split units. It enables:
- Local network access for control and monitoring.
- TCP/IP communication on port 51443, allowing direct commands.
- JSON-like API commands for temperature, mode, fan speed, and swing.
No physical modification is needed once installed; the module works over your existing Wi-Fi.
Initial setup of the WF-RAC adapter in Access Point Mode
To put the WF-RAC WiFi adapter of your SRK wall-mounted unit into Access Point Mode and connect it to your home network, proceed as follows.
⚠️ Important: Start with the WF-RAC in standby, place it on a 2.4 GHz VLAN, temporarily disable 5 GHz during pairing, allow TCP 51443 and ICMP – it stays reachable even in standby.
- On the IR remote, press the Menu button 5 times (use a screwdriver tip if necessary) until “SL” appears on the display.
- Press the Timer button twice until “E2” is shown.
- Confirm with the SET button – the adapter now starts in Access Point Mode.
- On your smartphone, connect to the temporary WiFi
Smart-M-{MAC-Adresse}using the default passwordRAC2WLAN. - Open the app and enter the SSID and password of your home WiFi. Confirm to complete the setup.
After that, the adapter restarts and connects automatically to your router.
Quick Test: Check your WF‑RAC module on the network
Before adding it to Home Assistant, it’s helpful to ensure your WF‑RAC module is online.
Step 1: Find the IP
- Check your router’s device list for the WF‑RAC module. Example IP:
192.168.1.45. - The device is ping-visible; ICMP must be allowed across router boundaries for remote reachability.
Step 2: Test Connectivity
On Linux using nc (netcat):
nc 192.168.1.45 51443On Windows using telnet:
Open Command Prompt.
cmdMake sure Telnet is installed:
dism /online /Enable-Feature /FeatureName:TelnetClientConnect to the module:
telnet 192.168.1.45 51443Step 3: Interpret the Response
- This confirms the module is reachable and ready for Home Assistant.
Note: This test does not control the AC yet – it only verifies network connectivity. If Home Assistant and the WF‑RAC module are in different subnets, direct TCP communication will work as long as routing allows access to port 51443; discovery via multicast is not required in this setup.
Home Assistant HACS integration
Once your module responds, you can integrate it into HA via HACS:
- Install HACS if not already done.
- Open Home Assistant and navigate to HACS.
- In the top right corner, click the three dots ••• and select “Custom repositories.”
- Add the following:
- Repository URL: https://github.com/jeatheak/Mitsubishi-WF-RAC-Integration
- Category/Type: Integration
- After adding, find the new integration in HACS (search for “Mitsubishi WF-RAC”), then install it.
- Restart Home Assistant when prompted.
- Install and restart Home Assistant.
- Navigate to Settings → Devices & Services → Add Integration, search for “Mitsubishi WF‑RAC”, and enter the module’s IP.

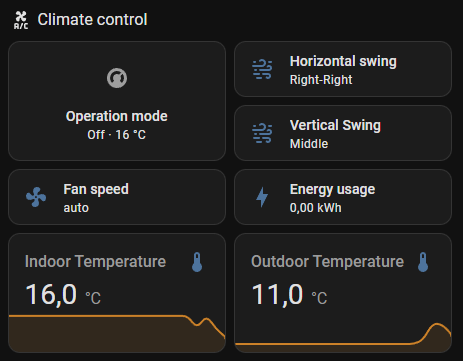
After this, HA will automatically create climate entities and sensors, allowing:
- Temperature, mode, fan speed, and swing control.
- Fully local, cloud-free operation.
Manual installation (without HACS)
If you prefer not to use HACS:
- Download or clone the repository: jeatheak/Mitsubishi-WF-RAC-Integration.
- Copy the folder named custom_components/mitsubishi_wf_rac into your Home Assistant configuration folder under /custom_components/mitsubishi_wf_rac.
- Restart Home Assistant.
- Add the integration via Settings → Devices & Services → Add Integration, as described above.
How the module communicates
The WF‑RAC module uses a TCP/IP connection on port 51443 and a JSON-like protocol:
- Request example: Get current AC status
{"command": "getAirconStat"}- Response example:
{
  "currentTemp": 23.5,
  "targetTemp": 21,
  "operationMode": "cool",
  "fanSpeed": 3,
  "swingVertical": true,
  "swingHorizontal": false
}- Command example: Set temperature and fan
{
  "command": "setAirconStat",
  "temperature": 22,
  "mode": "cool",
  "fan": 2,
  "swingVertical": true
}
The HACS integration handles binary encoding and CRC checksums, so you don’t need to manually encode packets.
Simplifying terms
- Port 51443: The “door” to talk to the module.
- JSON: Text format for commands and status, easy to read.
- CRC/checksum: Ensures messages aren’t corrupted.
- Polling: HA regularly asks the module for updates.
Troubleshooting and tips
- Ensure Home Assistant can reach the WF‑RAC module on port 51443.
- Typical issues: IP conflicts, firewall rules, or VLAN restrictions.
- Keep the module on your home network; do not expose it to the internet.
- If the module is unreachable, a power cycle or network reset often resolves issues.
Advantages of local control
- Faster response than cloud-based apps.
- No Internet required.
- Fully privacy-friendly and stable.
- Automation and monitoring entirely local.
Compatible models1
If you are looking for MHI air conditioning units with smart RF RAC functionality, the current wall-mounted, floor-standing, and ducted models from the SRK, SRF, and SRR series are the right choice. Especially models in the S series and all “WF” types come either factory-equipped or can be retrofitted with the WF-RAC WiFi adapter, enabling intelligent app control and timer functions. This allows Mitsubishi Heavy Industries units to be operated comfortably and flexibly in everyday life – perfect for modern, connected homes and workplaces.
Conclusion
Using the WF‑RAC module with Home Assistant provides direct, local control of Mitsubishi Heavy split units. TCP/IP communication over port 51443 works across subnets if routing allows, and no cloud or multicast discovery is needed. This setup gives full access to climate control and monitoring while staying entirely local and secure.
- Note: Please always read the product description carefully before purchasing or using a Mitsubishi Heavy Industries unit to ensure that features like RF RAC are included and that the device meets your specific needs. ↩︎