When a ZFS pool shows DEGRADED, it means a disk has failed or stopped responding. ZFS keeps your data safe, but acting quickly to restore full redundancy is crucial. Although I’ve gone through this replacement process multiple times, it happens so rarely that I always need to stop and think about the exact steps again. Since I often struggle to find clear documentation from others, I decided to write this guide in blog form – partly as a reference for myself, in case another disk fails in the future.
Before touching hardware, you must know exactly which disk is faulted. ZFS often reports only a UUID, which doesn’t match the physical drive label.
Click here for a typical error message by email from TrueNAS when a hard drive fails.
The number of I/O errors associated with a ZFS device exceeded
acceptable levels. ZFS has marked the device as faulted.

impact: Fault tolerance of the pool may be compromised.
eid: 24386
class: statechange
state: FAULTED
host: nas
time: 2025-08-31 06:29:08+0200
vpath: /dev/disk/by-partuuid/939ef7f2-e5cc-4106-bcdb-7d502d7ef7f4
vguid: 0x89E829CA9A20DC56
pool: pool-03 (0x82FD0E5C6A403357)
ZFS has finished a scrub:
eid: 24390
class: scrub_finish
host: nas
time: 2025-08-31 06:30:44+0200
pool: pool-03
state: DEGRADED
status: One or more devices are faulted in response to persistent errors.
Sufficient replicas exist for the pool to continue functioning in a
degraded state.
action: Replace the faulted device, or use 'zpool clear' to mark the device
repaired.
scan: scrub repaired 0B in 00:01:36 with 0 errors on Sun Aug 31 06:30:44 2025
config:
NAME STATE READ WRITE CKSUM
pool-03 DEGRADED 0 0 0
mirror-0 DEGRADED 0 0 0
53c75b7f-4529-497e-9563-b21c54c9dc59 ONLINE 0 0 0
939ef7f2-e5cc-4106-bcdb-7d502d7ef7f4 FAULTED 6 4 0 too many errors
errors: No known data errorsNew alerts:
Device: /dev/sde [SAT], Read SMART Self-Test Log Failed.
Device: /dev/sde [SAT], Read SMART Error Log Failed.
Current alerts:
Device: /dev/sde [SAT], not capable of SMART self-check.
Device: /dev/sde [SAT], failed to read SMART Attribute Data.
Device: /dev/sde [SAT], Read SMART Self-Test Log Failed.
Device: /dev/sde [SAT], Read SMART Error Log Failed.On TrueNAS SCALE, you may need to use
sudoto run ZFS commands successfully, as administrative privileges are required to access pool information.
Run:
sudo zpool list
sudo zpool status -P poolname
sudo smartctl -i /dev/disk/by-partuuid/UUID
This shows the disk under /dev/disk/by-id/ with its serial number. Match this to the physical drive using labels, IPMI, LED indicators, or enclosure tools.
Note: Reading the serial number via
smartctlis only possible as long as the drive still responds to SMART commands.
If the drive has already failed or is unresponsive, you must use a process of elimination by checking the serial numbers of the other drives in the pool to determine which one is faulty.
📝 Example: Klick here for an example
sudo zpool list
[sudo] password for admin:
NAME          SIZE  ALLOC   FREE  CKPOINT  EXPANDSZ   FRAG    CAP  DEDUP    HEALTH  ALTROOT
boot-pool     102G  2.72G  99.3G        -         -     5%     2%  1.00x    ONLINE  -
pool-03       119G  43.6G  75.4G        -         -    18%    36%  1.00x  DEGRADED  /mnt
sudo zpool status -P pool-03
pool: pool-03
state: DEGRADED
status: One or more devices are faulted in response to persistent errors.
Sufficient replicas exist for the pool to continue functioning in a
degraded state.
action: Replace the faulted device, or use 'zpool clear' to mark the device
repaired.
scan: scrub repaired 0B in 00:01:36 with 0 errors on Sun Aug 31 06:30:44 2025
config:
NAME STATE READ WRITE CKSUM
pool-03-ssd DEGRADED 0 0 0
mirror-0 DEGRADED 0 0 0
/dev/disk/by-partuuid/53c75b7f-4529-497e-9563-b21c54c9dc59 ONLINE 0 0 0
/dev/disk/by-partuuid/939ef7f2-e5cc-4106-bcdb-7d502d7ef7f4 FAULTED 6 4 0 too many errors
errors: No known data errorssudo smartctl -i /dev/disk/by-partuuid/939ef7f2-e5cc-4106-bcdb-7d502d7ef7f4
smartctl 7.4 2023-08-01 r5530 [x86_64-linux-6.1.74-production+truenas] (local build)
Copyright (C) 2002-23, Bruce Allen, Christian Franke, www.smartmontools.org
=== START OF INFORMATION SECTION ===
Device Model: LITEONIT LCS-128M6S 2.5 7mm 128GB
Serial Number: TW032GYJ51234567890
Firmware Version: DC7110B
User Capacity: 128,035,676,160 bytes [128 GB]
Sector Size: 512 bytes logical/physical
Rotation Rate: Solid State Device
TRIM Command: Available
Device is: Not in smartctl database 7.3/5528
ATA Version is: ATA8-ACS, ATA/ATAPI-7 T13/1532D revision 4a
SATA Version is: SATA 3.1, 6.0 Gb/s (current: 6.0 Gb/s)
Local Time is: Mon Sep 1 14:50:33 2025 CEST
SMART support is: Available - device has SMART capability.
SMART support is: EnabledOptional: Offline the disk
- Only if the disk cannot be clearly identified.
- Prevents ZFS from marking additional errors if you accidentally interact with the wrong drive.
- Avoid offline if the disk is already clearly identified, as it temporarily reduces redundancy.
sudo zpool offline poolname /dev/disk/by-id/DEVICEOffline is a protective measure, not a routine step. Always aim to identify the disk first.
Diagnostic before replace
Before replacing a disk, it’s worth checking if the fault was caused by a transient issue (loose cable, temporary I/O error) or if the disk is truly failing.
Run the following checks:
# Show detailed SMART data
sudo smartctl -a -d sat /dev/disk/by-id/DEVICE

# Start a short self-test
sudo smartctl -t short -d sat /dev/disk/by-id/DEVICE

# Check system logs for disk I/O errors
sudo dmesg | grep -i 'sdX\|disk\|error'
📝 Example: Klick here for an example
ls -l /dev/disk/by-partuuid/939ef7f2-e5cc-4106-bcdb-7d502d7ef7f4
lrwxrwxrwx 1 root root 10 May  3  2024 /dev/disk/by-partuuid/939ef7f2-e5cc-4106-bcdb-7d502d7ef7f4 -> ../../sde1
sudo smartctl -t short -d sat /dev/sde1
smartctl 7.4 2023-08-01 r5530 [x86_64-linux-6.1.74-production+truenas] (local build)
Copyright (C) 2002-23, Bruce Allen, Christian Franke, www.smartmontools.org
Read Device Identity failed: Input/output error
If this is a USB connected device, look at the various --device=TYPE variants
A mandatory SMART command failed: exiting. To continue, add one or more '-T permissive' options.sudo dmesg | grep -i 'sdX\|disk\|error'
...
[41902794.859943] blk_print_req_error: 2 callbacks suppressed
[41902794.859945] I/O error, dev sde, sector 4128 op 0x0:(READ) flags 0x800 phys_seg 28 prio class 2
[41902794.860059] I/O error, dev sde, sector 4640 op 0x0:(READ) flags 0x800 phys_seg 28 prio class 2
[41902794.860136] I/O error, dev sde, sector 250068000 op 0x0:(READ) flags 0x800 phys_seg 28 prio class 2
[41902794.860196] I/O error, dev sde, sector 250068512 op 0x0:(READ) flags 0x800 phys_seg 28 prio class 2
[41902794.871457] I/O error, dev sde, sector 32 op 0x0:(READ) flags 0x800 phys_seg 28 prio class 2
[41902794.871479] I/O error, dev sde, sector 544 op 0x0:(READ) flags 0x800 phys_seg 28 prio class 2The I/O errors in dmesg strongly indicate physical issues, such as:
- Defective sectors / early drive failure
- Cable or port problems (SATA/power)
- Controller issues
Interpretation
- If SMART reports reallocated sectors, pending sectors, or repeated errors → the disk should be replaced.
- If SMART looks clean and the issue appears once (e.g. after a cable bump), a temporary reset with
zpool clearmight be enough. - Multiple errors or repeated failures mean replacement is the only safe option.
Reset vs. replace
In most cases, replacement is the safer choice. A reset should only be considered if diagnostics suggest a temporary glitch (e.g. loose cable, short I/O hiccup).
| Option | Pros | Cons |
|---|---|---|
Reset (zpool clear) | Quick, no hardware swap needed. Useful if the issue was temporary (cable, power, vibration). | Does not fix a failing disk. Errors may return. Running degraded for longer increases risk if another disk fails. |
| Replace | Restores full redundancy and stability. Eliminates the risk of relying on a bad disk. | Requires new hardware. Resilvering takes time and can impact performance depending on pool size. |
Rule of thumb:
- Use reset only if diagnostics are clean and the problem clearly looks temporary.
- Otherwise, replace immediately to protect your data.
Resetting a disk (rare cases)
A reset should only be attempted if diagnostics show the disk is healthy and the issue was likely temporary (e.g. loose cable, brief I/O error).
Commands
Clear the error state:
sudo zpool clear poolname /dev/disk/by-id/DEVICEOptionally, take the disk offline and back online to test stability:
sudo zpool offline poolname /dev/disk/by-id/DEVICE
sudo zpool online poolname /dev/disk/by-id/DEVICE
Important notes
- Resetting does not repair hardware – it only clears ZFS’ error flags.
- If errors return after a reset, replace the disk immediately.
- Never rely on reset as a permanent solution.
Replacing a faulted disk
Replacing the disk is the safest way to restore redundancy and ensure pool stability.
Steps to replace
- Take the disk offline – ZFS will mark it as
OFFLINEand stop accessing the device:
sudo zpool offline poolname /dev/disk/by-partuuid/UUID- Make a note of the UUID of the faulted hard drive
- Install / Replace the new disk physically in your system.
- Check the new disc for existing partitions and delete them
sudo lsblk -o NAME,SIZE,MODEL,SERIAL,UUID,PARTUUID
sudo sgdisk --zap-all /dev/NEW_DEVICE
sudo wipefs -a /dev/NEW_DEVICE
sudo lsblk -o NAME,SIZE,MODEL,SERIAL,UUID,PARTUUID /dev/NEW_DEVICE- Identify by-id path of new disk
When replacing a failed disk in ZFS, you should always use the persistent by-id path of the new disk instead of a UUID or
/dev/sdX, as this ensures stability across reboots and device reordering.
- Run the replacement command in ZFS:
ls -l /dev/disk/by-id/ | grep S1K2NSAF458132
sudo zpool replace poolname /dev/disk/by-partuuid/FAULTED_UUID /dev/disk/by-id/NEW_ID- Monitor the resilvering process until it completes:
sudo zpool status poolname📝 Example: Klick here for an example
sudo zpool offline pool-03 /dev/disk/by-partuuid/939ef7f2-e5cc-4106-bcdb-7d502d7ef7f4
sudo zpool status -P pool-03

  pool: pool-03
 state: DEGRADED
status: One or more devices has experienced an unrecoverable error.  An
        attempt was made to correct the error.  Applications are unaffected.
action: Determine if the device needs to be replaced, and clear the errors
        using 'zpool clear' or replace the device with 'zpool replace'.
   see: https://openzfs.github.io/openzfs-docs/msg/ZFS-8000-9P
  scan: scrub repaired 0B in 00:01:36 with 0 errors on Sun Aug 31 06:30:44 2025
config:

        NAME                                                            STATE     READ WRITE CKSUM
        pool-03                                                         DEGRADED     0     0     0
          mirror-0                                                      DEGRADED     0     0     0
            /dev/disk/by-partuuid/53c75b7f-4529-497e-9563-b21c54c9dc59  ONLINE       0     0     0
            /dev/disk/by-partuuid/939ef7f2-e5cc-4106-bcdb-7d502d7ef7f4  OFFLINE      6     4     0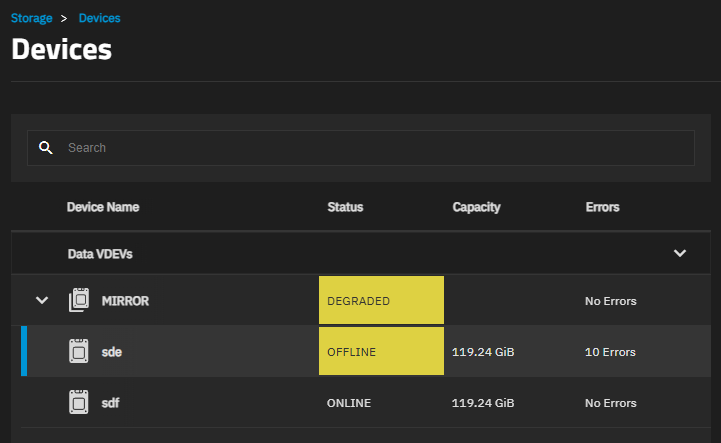
sudo zpool status -P pool-03

  pool: pool-03
 state: DEGRADED
status: One or more devices has been removed by the administrator.
        Sufficient replicas exist for the pool to continue functioning in a
        degraded state.
action: Online the device using zpool online' or replace the device with
        'zpool replace'.
  scan: scrub repaired 0B in 00:01:36 with 0 errors on Sun Aug 31 06:30:44 2025
config:

        NAME                                                            STATE     READ WRITE CKSUM
        pool-03                                                         DEGRADED     0     0     0
          mirror-0                                                      DEGRADED     0     0     0
            /dev/disk/by-partuuid/53c75b7f-4529-497e-9563-b21c54c9dc59  ONLINE       0     0     0
            /dev/disk/by-partuuid/939ef7f2-e5cc-4106-bcdb-7d502d7ef7f4  REMOVED      0     0     0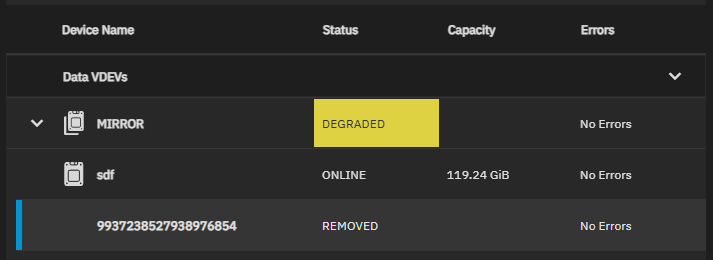
lsblk -o NAME,SIZE,MODEL,SERIAL,UUID,PARTUUID

sde         119.2G SAMSUNG SSD SM841N 2.5 7mm 128GB  S1K2NSAF458132
├─sde1        350M         8A2D-DAE6                            9bc34cc7-65c9-4641-bf10-eb84029fb6fe
├─sde2        128M                                              9533ad55-b050-459f-aca3-8be943d5e068
└─sde3      118.8G         96D20179D2015EBD                     531c7172-cdae-4d6c-b068-974ef2e3c490

sudo sgdisk --zap-all /dev/sde

GPT data structures destroyed! You may now partition the disk using fdisk or
other utilities.

sudo wipefs -a /dev/sde

lsblk -o NAME,SIZE,MODEL,SERIAL,UUID,PARTUUID /dev/sde

NAME   SIZE MODEL                            SERIAL         UUID PARTUUID
sde  119.2G SAMSUNG SSD SM841N 2.5 7mm 128GB S1K2NSAF458132
ls -l /dev/disk/by-id/ | grep S1K2NSAF458132
lrwxrwxrwx 1 root root 9 Sep 2 17:20 ata-SAMSUNG_SSD_SM841N_2.5_7mm_128GB_S1K2NSAF458132 -> ../../sde
sudo zpool replace pool-03 /dev/disk/by-partuuid/939ef7f2-e5cc-4106-bcdb-7d502d7ef7f4 /dev/disk/by-id/ata-SAMSUNG_SSD_SM841N_2.5_7mm_128GB_S1K2NSAF458132
sudo zpool status pool-03

  pool: pool-03
 state: ONLINE
  scan: resilvered 45.5G in 00:18:50 with 0 errors on Tue Sep  2 18:25:48 2025
config:

        NAME                                                     STATE     READ WRITE CKSUM
        pool-03                                                  ONLINE       0     0     0
          mirror-0                                               ONLINE       0     0     0
            53c75b7f-4529-497e-9563-b21c54c9dc59                 ONLINE       0     0     0
            ata-SAMSUNG_SSD_SM841N_2.5_7mm_128GB_S1K2NSAF458132  ONLINE       0     0     0
Important notes
- Only replace one disk at a time to avoid putting the pool at risk.
- Wait until resilvering is fully finished before removing or touching another disk.
- Performance may be reduced during resilvering – this is normal.
- If the replacement disk is larger than the original, ZFS will use only the old disk’s size until the entire vdev is upgraded.
After replacing a disk
Monitor resilvering
Run:
sudo zpool status poolnameuntil the resilver completes. The pool status should return to ONLINE. Don’t make further changes during resilvering.
📝 Example: Klick here for an example
 sudo zpool status pool-03

  pool: pool-03
 state: DEGRADED
status: One or more devices is currently being resilvered.  The pool will
        continue to function, possibly in a degraded state.
action: Wait for the resilver to complete.
  scan: resilver in progress since Tue Sep  2 18:06:58 2025
        45.3G / 45.3G scanned, 827M / 45.3G issued at 39.4M/s
        812M resilvered, 1.78% done, 00:19:17 to go
config:

        NAME                                                       STATE     READ WRITE CKSUM
        pool-03                                                    DEGRADED     0     0     0
          mirror-0                                                 DEGRADED     0     0     0
            53c75b7f-4529-497e-9563-b21c54c9dc59                   ONLINE       0     0     0
            replacing-1                                            DEGRADED     0     0     0
              939ef7f2-e5cc-4106-bcdb-7d502d7ef7f4                 REMOVED      0     0     0
              ata-SAMSUNG_SSD_SM841N_2.5_7mm_128GB_S1K2NSAF458132  ONLINE       0     0     0  (resilvering)

errors: No known data errors
Run a scrub
After resilvering has finished, start a scrub:
sudo zpool scrub poolnameThis verifies the new disk and ensures data integrity across the pool. You can monitor its progress at any time using:
sudo zpool status poolnameCheck system logs & SMART
Look for new disk errors with:
dmesg | grep sdXor with SMART:
smartctl -a /dev/sdXConfirm the new disk is healthy.
📝 Example: Klick here for an example
sudo zpool status pool-03

  pool: pool-03
 state: ONLINE
  scan: scrub in progress since Tue Sep  2 18:32:10 2025
        45.6G / 45.6G scanned, 13.2G / 45.6G issued at 396M/s
        0B repaired, 28.87% done, 00:01:23 to go
config:

        NAME                                                     STATE     READ WRITE CKSUM
        pool-03                                                  ONLINE       0     0     0
          mirror-0                                               ONLINE       0     0     0
            53c75b7f-4529-497e-9563-b21c54c9dc59                 ONLINE       0     0     0
            ata-SAMSUNG_SSD_SM841N_2.5_7mm_128GB_S1K2NSAF458132  ONLINE       0     0     0

errors: No known data errors
sudo zpool status pool-03
pool: pool-03
state: ONLINE
scan: scrub repaired 0B in 00:01:48 with 0 errors on Tue Sep 2 18:33:58 2025
config:
NAME STATE READ WRITE CKSUM
pool-03 ONLINE 0 0 0
mirror-0 ONLINE 0 0 0
53c75b7f-4529-497e-9563-b21c54c9dc59 ONLINE 0 0 0
ata-SAMSUNG_SSD_SM841N_2.5_7mm_128GB_S1K2NSAF458132 ONLINE 0 0 0
errors: No known data errorsUpdate documentation
Note the new disk’s serial number and location in your records (rack position, slot, enclosure mapping). This avoids confusion in future replacements.
To make hardware documentation easier and more consistent, the following table summarizes all storage devices currently detected in the system. Each device entry includes essential information such as model, serial number, firmware version, interface, rotational speed, capacity, and form factor. This allows you to quickly identify drives, track firmware versions, and maintain an up-to-date inventory.
echo "| Device | Model | Serial | Firmware | Interface | Rotation | Capacity | Form Factor |"
echo "|--------|-------|--------|---------|----------|----------|---------|------------|"

for dev in /dev/sd?; do
    info=$(sudo smartctl -i "$dev")
    model=$(echo "$info" | grep "Device Model" | cut -d: -f2- | xargs)
    serial=$(echo "$info" | grep "Serial Number" | cut -d: -f2- | xargs)
    firmware=$(echo "$info" | grep "Firmware Version" | cut -d: -f2- | xargs)
    interface=$(echo "$info" | grep "SATA Version" | cut -d: -f2- | xargs)
    rotation=$(echo "$info" | grep "Rotation Rate" | cut -d: -f2- | xargs)
    capacity=$(echo "$info" | grep "User Capacity" | sed -E 's/.*\[([^]]+)\]/\1/')
    formfactor=$(echo "$info" | grep "Form Factor" | cut -d: -f2- | xargs)
    echo "| $dev | $model | $serial | $firmware | $interface | $rotation | $capacity | $formfactor |"
done
Final thoughts
A degraded ZFS pool is not a reason to panic – redundancy is working as designed. But it is also a clear signal to act quickly and carefully. The safest path is almost always to replace a faulted drive and restore full redundancy through resilvering.
Take your time to correctly identify the disk, follow best practices (offline before removal, never pull blindly), and run diagnostics if you suspect a false alarm. A reset may buy you time in rare cases, but it should not be your long-term strategy.
With the right preparation – and by respecting ZFS’s tools – you can handle disk failures safely, avoid data loss, and keep your pool healthy for the long run.
Tip: If you have the NAS open, you can also use a vacuum, compressed air spray, or an air compressor to clean it.