Node-RED is a programming tool based on Node.js that can be used to connect hardware devices, APIs and online services via browser-based workflow processing. It can be used to map complex processes and actions in the smart home.
As an API, Alamos offers the option of IFTTT webhooks or generic webhooks in the separately available annual licence. Even if Node-RED itself is basically webhook-capable, the technical dependencies (public IP, NAT, firewall) with the requirement for secure operation are quite complex.
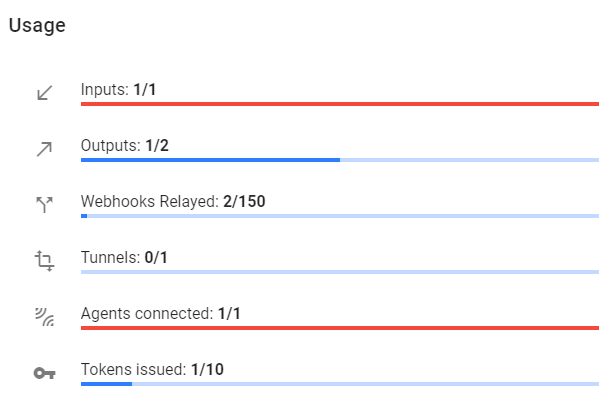
This can be remedied by the provider https://webhookrelay.com, which makes the actual webhook available on the Internet and forwards it to this instance using an agent available for Node-RED (webhook relay). Webhookrelay.com provides a free “Free Starter” package https://webhookrelay.com/pricing/ for developers and home automation enthusiasts. The package essentially includes 1 webhook (input) and 2 outputs (e.g. Node-RED agent) with 150 relays per month (corresponds to the number of alarms), which is usually sufficient for home use.
Konfiguration Webhookrelay
- Create an account at webhookrelay.com.
- The free package is automatically activated after registration.
- Confirmation of the e-mail address (otherwise no endpoint can be created).
- Creation of an access token at https://my.webhookrelay.com/tokens
- Keep the standard selection.
- It is important to save all key generation details as requested before closing the window again.
- Creation of a public endpoint (data input) at https://my.webhookrelay.com/new-basic-forwarding
- Name: “Any” e.g. alamos.
- Public endpoint (data input): „Use default input domain“.
- Destination URL: „Empty“.
- Output type: „Internal (private network)“.
The “Token” that has just been created, the defined “Input” (webhook) and “Output” (relay via the agent) are then displayed in the account information (https://my.webhookrelay.com/account). “Agents connected” does not yet exist at this point (0/1).
As long as the configuration has not yet been carried out in Node-RED itself, the client is therefore also still displayed as “Disconnected” in the dashboard (https://my.webhookrelay.com/buckets). However, the connection to the webhook (input) can already be made either as a GET or POST request.
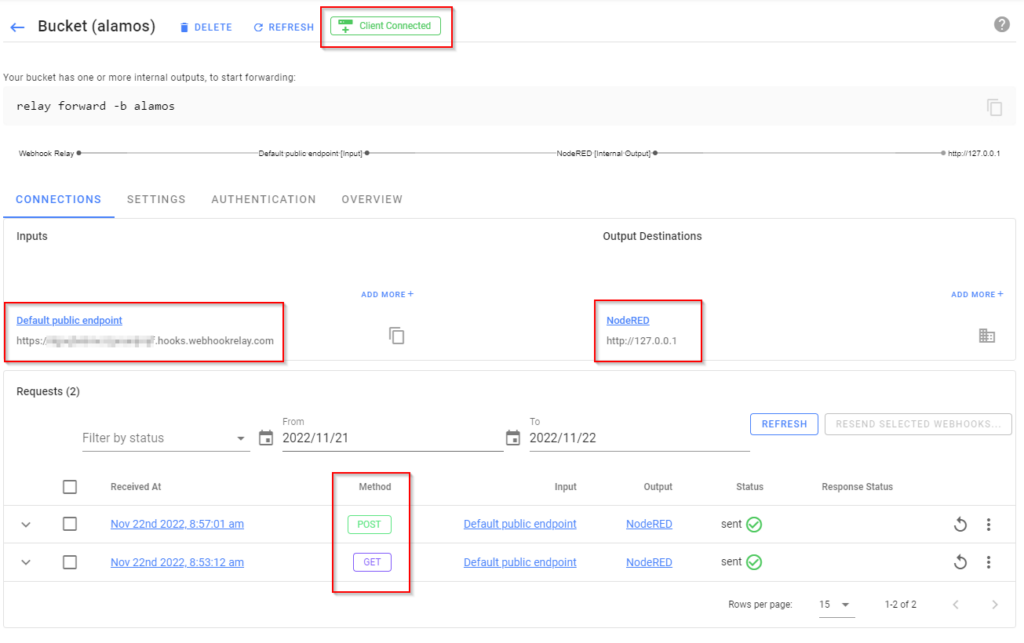
The generated “Default public endpoint” is the URL that is to be stored in the aPager Pro app as “Configure webhook 1”, for example. As there are already separate instructions for this, these steps are not described in detail in these instructions.
Konfiguration Node-RED
- Log in to the web frontend of the existing Node-RED instance.
- Open the palette and install the “node-red-contrib-webhookrelay” node
- Add and configure new “Node”.
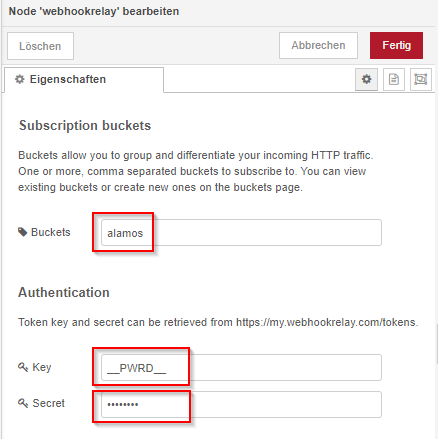
- For “Buckets”, the “Bucket name” used in webhookrelay.com must be used in our example “alamos”. This is necessary to ensure that the relay agent is assigned to the correct bucket and connection.
- The key generated in the previous step “Generate access token” must be entered under “Key”.
- The same applies to “Secret”, which was also generated in this step.
If you have done everything correctly by then, the webhookrelay node in Node-RED
and displayed as “connected” in the “Bucket alamos” webhookrelay.com dashboard.

Erstellung Node-RED Flow
In Node-RED, the payload coming from Alamos aPager Pro is structured as follows in the event of an alarm:
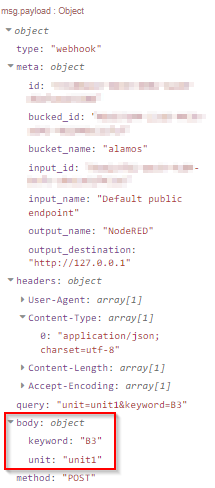
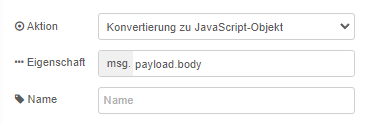
The relevant information that you want to continue working with is therefore in msg.payload.body. You can use the json node to convert this information into JavaScript objects so that you can then continue working with them.
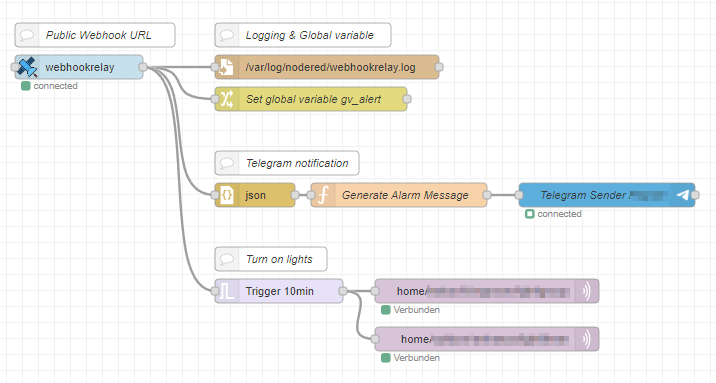
With the function node, it is possible to write the two payloads to variables and then continue working with them.

There are no limits to your own creativity here, so you can, for example, inform your wife via Telegram that you are on duty or have the light in the hallway and entrance area switch on automatically for 10 minutes.
Palo Alto Security Scan
At irregular intervals, I have noticed that the trigger for the light has also been activated, even though no alarm has been triggered. A troubleshooting revealed that not only valid alarm messages including JSON but also security messages from Palo Alto were delivered via the webhook relay and thus triggered the trigger.
{"type":"webhook","meta":{"id":"...","bucked_id":"...","bucket_name":"alamos","input_id":"...","input_name":"Default public endpoint","output_name":"NodeRED","output_destination":"http://127.0.0.1"},"headers":{"User-Agent":["Expanse, a Palo Alto Networks company, searches across the global IPv4 space multiple times per day to identify customers' presences on the Internet. If you would like to be excluded from our scans, please send IP addresses/domains to: scaninfo@paloaltonetworks.com"]},"query":"","body":"","method":"GET"}This could be solved by moving the trigger nodes behind the validation and generation of the alarm message.