Checkmk is a powerful IT monitoring solution originally developed by Mathias Kettner. Today, it is maintained by Checkmk GmbH (formerly Tribe29) and provides comprehensive monitoring for servers, networks, applications, and cloud environments.

The RAW Edition is open-source, bundling the OMD core, Nagios, web interface, and agent plugins. Agents can communicate via TCP (xinetd) or SSH, and Checkmk supports extensive customization through plugins. This article focuses on RHEL 9 and its 1:1 compatible derivatives, such as AlmaLinux, Rocky Linux, and CentOS Stream, covering installation, agent management, SSH monitoring, updates, backup/restore, and security best practices.
CheckMK is also available in Enterprise Edition (CEE) for corporate environments, featuring the proprietary MicroCore engine. This provides faster checks, better scaling for large infrastructures, and advanced high-availability options compared to the RAW Edition.
Architecture and Components
| Component | Description | Notes |
|---|---|---|
| OMD (Open Monitoring Distribution) | Bundles Checkmk Nagios Core, web interface, and agents. | Provides site management, versioning, and isolated environments. |
| MicroCore (proprietary component only in Enterprise Edition (CEE)) | Checkmk’s own monitoring engine for efficient checks. | Replaces some Nagios functionality for better performance in large infrastructures. |
| Nagios Core | Classic monitoring engine included in RAW Edition. | Handles host/service checks, scheduling, and alerts. |
| Web Interface | User interface for dashboards, alerts, configuration, and site management. | Supports multiple sites, roles, and user access control. |
| Agents | Installed on monitored hosts (Linux, Windows, network devices). | Communicate via TCP (xinetd) or SSH; extendable with plugins. |
| Plugins | Extend agent capabilities to custom applications, databases, or specialized hardware. | Can be installed locally on hosts or centrally managed. |
| Sites | Isolated Checkmk instances managed under OMD. | Each site has its own configuration, users, and monitoring data. |
| SSH Integration | Allows secure agent access without opening TCP ports. | Recommended for production environments. |
| xinetd Integration | Provides agent access via TCP port 6556. | Can be disabled if using SSH; optional for RAW Edition. |
Installation of CheckMK RAW Core
CheckMK RAW Edition provides a complete monitoring platform with OMD, Nagios Core, and the web interface. On RHEL 9, installing the core involves preparing the OS, installing required packages, and deploying the RPM package.
Operating System Preparation
| Requirement | Description |
|---|---|
| EPEL repository | Provides access to extra packages needed by CheckMK. |
| xinetd | Optional, required only if TCP-based agent access will be used. |
| OpenSSL | Required for secure communications. |
| Python 3 | Needed for scripts and OMD functionality. |
| Graphviz | Used for graphical visualization in dashboards and reports. |
| SELinux adjustment | Allow web interface to access the network. |
| Firewall considerations | No additional ports required for the core itself. TCP 6556 only relevant for agents via xinetd. |
Copy & Paste Commands for OS Preparation and Core Installation:
# Install required packages
sudo dnf install epel-release -y
sudo dnf config-manager --set-enabled crb
sudo dnf install xinetd openssl python3 graphviz-gd -y

# Verify Python
python3 -V

# Adjust SELinux
sudo setsebool -P httpd_can_network_connect 1

# Download CheckMK RAW
wget https://download.checkmk.com/checkmk/2.3.0p27/check-mk-raw-2.3.0p27-el9-38.x86_64.rpm

# Install CheckMK RAW
sudo dnf install check-mk-raw-2.3.0p27-el9-38.x86_64.rpm -y

# Verify installation
omd version
Site Creation
After installing the CheckMK RAW Core, the next step is to create an isolated monitoring site. A site encapsulates all configuration, users, and monitoring data, and allows multiple versions of CheckMK to coexist on the same system.
Key Concepts
| Concept | Description |
|---|---|
| Site | An independent instance of CheckMK under OMD, with its own configuration, logs, and database. |
| Site Name | Unique identifier for the site. Example: mysite. |
| Web Interface Access | Each site has its own URL: http://<server>/<site> or http://checkmk.examplecorp.io/mysite. |
| Versioning | Sites are linked to a specific CheckMK version. Multiple versions can exist on the system; one version is marked (default) for new sites. |
| Permissions | Sites are created with dedicated users; OMD handles permissions and process separation. |
Creating and Starting a Site
Copy & Paste Commands:
# Create a new site named "mysite"
sudo omd create mysite

# Start the site
sudo omd start mysite

# Verify site status
omd status mysite
Notes:
- The creation process sets up directories, user permissions, and temporary files.
- The site runs under its own system user, e.g.,
mysite. - After starting, access the web interface at:
http://checkmk.examplecorp.io/mysite
Basic Site Management
| Command | Description |
|---|---|
omd stop mysite | Stops the site. |
omd restart mysite | Restarts the site. |
omd update mysite | Applies updates to the site when new versions are installed. |
omd versions | Lists all installed CheckMK versions. |
omd version | Shows the version used by the current site. |
Agent Installation and Setup
Agents collect metrics from monitored hosts. Communication can be TCP (xinetd) or SSH, and functionality can be extended via plugins.
Agent Installation
Example:
# Download the agent RPM from your CheckMK site
wget https://checkmk.examplecorp.io/mysite/check_mk/agents/check-mk-agent-2.3.0p6-1.noarch.rpm --no-check-certificate

# Install the agent
sudo dnf install check-mk-agent-2.3.0p6-1.noarch.rpm -y
Communication Methods
| Method | Description | Notes |
|---|---|---|
| TCP (xinetd) | Agent listens on port 6556. | Quick setup, but exposes a port; can be disabled if SSH is preferred. |
| SSH | Server connects via SSH to execute the agent. | More secure, avoids opening TCP ports; recommended for production. |
Dedicated Agent User and Sudoers
# Create agent user
sudo useradd cmkagent -c "CheckMK Agent" -m -s /bin/bash

# Configure sudoers
sudo tee /etc/sudoers.d/cmkagent << EOF
cmkagent ALL = NOPASSWD: /usr/bin/check_mk_agent
cmkagent ALL = NOPASSWD: /usr/lib/check_mk_agent/plugins/*
EOF- Restricts
cmkagentto running only the agent and plugins.
SSH Key Setup
- Generate key on CheckMK server (
mysite):
ssh-keygen -t rsa -b 3072 -f ~/.ssh/id_rsa- Deploy public key on agent host:
# Prepare authorized_keys
mkdir -p /home/cmkagent/.ssh/
touch /home/cmkagent/.ssh/authorized_keys
chmod 700 /home/cmkagent/.ssh/
chmod 644 /home/cmkagent/.ssh/authorized_keys
chown cmkagent:cmkagent /home/cmkagent/.ssh -R

# Add server public key
echo "command=\"sudo /usr/bin/check_mk_agent\" ssh-rsa AAAAB3NzaC... cmkserver@checkmk.examplecorp.io" >> /home/cmkagent/.ssh/authorized_keys- The
command="..."prefix restricts SSH connections to executing the agent only.
Individual Program Call
- On CheckMK server (
mysite), navigate to:Setup → Agents → Other → Integrations → Individual program call instead of agent access - Configure command line:
ssh -i ~/.ssh/id_rsa -o StrictHostKeyChecking=no cmkagent@$HOSTADDRESS$- Only executes the agent, no shell access.
Optional: Disabling TCP Agent and Enforcing SSH-Only Monitoring
If you prefer a more secure setup using SSH exclusively, you can disable the TCP-based CheckMK agent that runs via xinetd.
# Stop and disable xinetd service
sudo systemctl stop xinetd
sudo systemctl disable xinetd

# Optional: disable agent in xinetd configuration
sudo vim /etc/xinetd.d/check_mk
# set disable = yes- Recommended if SSH is used exclusively to avoid exposing TCP port 6556.
- Works seamlessly with the Individual Program Call setup for SSH-based monitoring.
- This step is optional; keep xinetd enabled if you want TCP agent access.
Updating Agents and Site Versions
Maintaining an up-to-date CheckMK installation ensures security, stability, and access to new monitoring features. Updates involve the CheckMK Core (site version) and agents on monitored hosts.
Updating the CheckMK Site Version
- Download the new CheckMK RAW RPM for Redhat Enterprise Linux 9:
https://checkmk.com/de/download?platform=cmk&distribution=redhat&release=el9&edition=cre
wget https://download.checkmk.com/checkmk/2.3.0p27/check-mk-raw-2.3.0p27-el9-38.x86_64.rpm- Update the installation:
sudo dnf install check-mk-raw-2.3.0p27-el9-38.x86_64.rpm -y- Verify current site and version:
su - mysite
omd versions
OMD - Open Monitoring Distribution Version 2.4.0p4.cre- Lists all installed CheckMK versions and shows which version the site
mysiteis using.
- Stop the site before updating:
omd stop- Apply the update to the site:
omd update
...
-| Generating configuration for core (type nagios)...
-| Precompiling host checks...OK
-|  38/38 Migrate legacy frozen aggregations....
-| No frozen aggregations found.
-| Done (success)
OK
Finished update.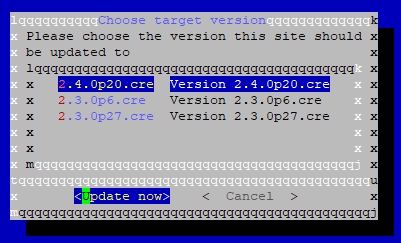
Notes:
- During the update, you may encounter configuration conflicts. Choose whether to keep (
k) or discard (d) each file carefully. - Always backup the site before updating:
omd backup mysite /path/to/backup/mysite-$(date +%F).tar.gz
- Restart the site after updating:
omd start
omd status
Updating Agents on Monitored Hosts
- Check the agent version used on the server:
Setup → Agents → Linux → Copy link to download latest agent - Download and update on each host:
wget https://checkmk.examplecorp.io/mysite/check_mk/agents/check-mk-agent-2.3.0p27-1.noarch.rpm --no-check-certificate
sudo dnf install check-mk-agent-2.3.0p27-1.noarch.rpm -y- Verify agent functionality:
sudo /usr/bin/check_mk_agent- Confirms the agent runs correctly and outputs metrics.
Cleaning Up Old Versions
- Check installed versions:
omd versions
rpm -qa | grep check-mk-raw- Remove obsolete versions (never delete the default version):
sudo rpm -e check-mk-raw-2.2.0p8-el9-38.x86_64
Leaving default version 2.4.0p20.cre- Ensure that the
mysitedefault version remains intact.
Best Practices
- Always backup the site before updating.
- Test agent updates on a single host before rolling out network-wide.
- Use SSH key-based updates for multiple hosts to simplify deployment.
- Keep at least one previous version of CheckMK on the system for rollback if needed.
Restoring a Site
- Stop the target site if it exists:
sudo omd stop mysite- Restore from the backup file:
sudo omd restore /path/to/backup/mysite-2025-10-01.tar.gz- The
restorecommand recreates the site structure, updates configurations, and restores all data. - During restoration, temporary files and directories are created automatically.
- Start the site after restoration:
sudo omd start mysite
omd status mysite- Verify that the site is running and accessible at:
http://checkmk.examplecorp.io/mysite
Verify Restored Site
- Check version:
omd version mysite- Check installed plugins and custom scripts.
- Ensure all hosts and services are visible in the web interface.
Notes and Best Practices
- Always test backups by restoring to a test environment before production.
- Store backup files in a separate location from the server to prevent data loss.
- Ensure matching CheckMK versions between backup and target server.
- Keep a log of restore operations for compliance and troubleshooting.
Conclusion
I have been using CheckMK for over 10 years, starting back when it was still developed by Mathias Kettner. Throughout this time, I have remained loyal to the platform, as it remains one of the most reliable and versatile monitoring solutions available today.
As part of my contributions, I have developed notification solutions for Telegram and Matrix, which integrate seamlessly with CheckMK and enhance its alerting capabilities:
Telegram is a fast, cloud-based messaging platform widely used for notifications, offering flexible APIs and strong encryption. Read the article here.
Matrix is an open, decentralized communication protocol that enables secure real-time messaging and integration with monitoring systems. Read the article here.
I am convinced that CheckMK is a high-quality, production-ready monitoring platform, and I am proud to contribute to its ecosystem and share practical solutions with the community.
Appendix: Official CheckMK Documentation
This tutorial focuses on the essential aspects for operating CheckMK, providing a concise extract of core installation, site management, agent setup, updates, backup/restore, and best practices.
For readers who want to dive deeper, the official CheckMK documentation is excellent and covers all topics in much greater detail.
- CheckMK RAW Basics and Site Management: https://docs.checkmk.com/latest/en/omd_basics.html
- Installation Guide (Linux): https://docs.checkmk.com/latest/en/installation.html
- Linux Agents (TCP & SSH) and Plugins: https://docs.checkmk.com/latest/en/agents_linux.html
- Updating Sites and Agents: https://docs.checkmk.com/latest/en/update.html
- Official Forum for Community Support: https://forum.checkmk.com/
- Download RAW Edition: https://checkmk.com/download