Managing Ansible automation code in the cloud is convenient, but storing encrypted secrets on third-party platforms like GitHub can feel uncomfortable. Even when using Ansible Vault, the encrypted data still resides on a server you don’t control. For developers running private automation code, a self-hosted Git platform in a lightweight LXC container offers full sovereignty, security, and workflow continuity.

This guide walks through setting up a Gitea instance on AlmaLinux 9, migrating your repositories from GitHub and integrating VS Code – all while retaining the GitHub experience locally.
Why move private repositories locally
Private Ansible runbooks often contain sensitive data. Moving them locally reduces exposure to third-party platforms and provides:
- Full data control — secrets never leave your environment
- Compliance-friendly storage – useful if policies forbid third-party hosting
- Freedom to use GitHub strictly for public/open-source projects
For single-user or small teams setups, Gitea is particularly well-suited. Unlike GitLab, which is resource-heavy, Gitea is lightweight and easy to maintain, while still providing the essential GitHub-like features.
Gitea vs. GitLab: Key facts & system requirements
The following table summarizes why Gitea is ideal for a solo homelab setup, showing both key facts and system considerations:
| Aspect | Gitea | GitLab CE/EE |
|---|---|---|
| Target Use | Solo devs, homelabs, small teams | Enterprise teams, CI/CD heavy |
| RAM | 512 MB – 1 GB | 4–8 GB |
| CPU | 1 vCPU | 2–4 vCPU |
| Disk | 1–5 GB (repos + metadata) | 10+ GB (app, DB, logs, repos) |
| Database | SQLite / MySQL / Postgres | PostgreSQL only |
| Complexity | Lightweight, single binary | Heavy stack (Ruby, Redis, Sidekiq) |
| TLS Handling | Built-in or via reverse proxy (Nginx) | Built-in, heavier configuration |
| Upgrade | Simple by replacing the binary | More involved (packages + DB migrations) |
| Workflow Compatibility | Git CLI, VS Code integration | Git CLI, VS Code, CI/CD pipelines |
Key takeaways: Gitea offers all the Git functionality needed for private automation, requires minimal system resources, and is easier to maintain in a homelab environment. GitLab is overkill for SOHO setups and demands more RAM, CPU, and disk space.
Architecture Overview
A simple, robust architecture for local Gitea:
- AlmaLinux 9 LXC on Proxmox – lightweight container
- Gitea instance on
git.examplecorp.io - Nginx reverse proxy handling HTTPS via private PKI or Let’s Encrypt
- Ansible Runbooks in private repositories
- Access via SSH or HTTPS from VS Code or CLI
This setup ensures full control, minimal resource usage, and a workflow equivalent to GitHub.
Creating the LXC container
Before installing Gitea, create a dedicated LXC container on your Proxmox host. Keeping it isolated makes backups, snapshots, and maintenance easier. For a SOHO setup, the following specs are more than enough:
- Container name:
git - OS template: AlmaLinux 9 (or Debian/Ubuntu if you prefer)
- CPU: 1 vCPU
- Memory: 1 GB RAM (512 MB works, but 1 GB is safer)
- Disk: 10 GB (5 GB minimum, depending on repository size)
- Network: Static IP, bridge to LAN, optional DNS entry
git.examplecorp.io
Installing Gitea on AlmaLinux 9 with Nginx
Prepare the container
dnf update -y
dnf install -y vim-enhanced nano git wget nginx
Create dedicated Gitea user
Run Gitea under its own system user:
sudo adduser --system --shell /bin/bash --comment 'Gitea Service User' --create-home --home /home/gitea giteaDownload the Gitea binary
Visit Gitea Downloads to find the latest stable version. Replace 1.24.5 with the current release:
wget -O /tmp/gitea https://dl.gitea.com/gitea/1.24.5/gitea-1.24.5-linux-amd64Install the binary to /opt/gitea
sudo mkdir -p /opt/gitea
sudo mv /tmp/gitea /opt/gitea/gitea
sudo chmod +x /opt/gitea/gitea
sudo chown -R gitea:gitea /opt/gitea
Set up Gitea directories
Create directories for configuration, repositories, logs, and other data:
sudo mkdir -p /opt/gitea/{custom,data,indexers,public,log}
sudo chown -R gitea:gitea /opt/gitea
sudo chmod -R 750 /opt/gitea
Create a systemd service
Create a systemd unit file:
sudo nano /etc/systemd/system/gitea.serviceInsert the following:
[Unit]
Description=Gitea
After=syslog.target
After=network.target

[Service]
User=gitea
Group=gitea
WorkingDirectory=/opt/gitea/
ExecStart=/opt/gitea/gitea web
Restart=always
Environment=USER=gitea HOME=/home/gitea GITEA_WORK_DIR=/opt/gitea

[Install]
WantedBy=multi-user.target
Save and exit.
Start and enable Gitea
Reload systemd, enable the service to start on boot, and start Gitea:
sudo systemctl daemon-reload
sudo systemctl enable --now gitea
sudo systemctl status gitea
Verifying Gitea is running
Check that Gitea is active:
sudo systemctl status giteaVerify it’s listening on port 3000:
sudo ss -tulpen | grep 3000Expected output shows Gitea running, e.g.:
tcp LISTEN 0 128 0.0.0.0:3000 0.0.0.0:* users:(("gitea",pid=1234,fd=6))Finally, open your browser:
http://<container-ip>:3000- You should see the Gitea setup page.
- For HTTPS via Nginx:
https://git.examplecorp.io
Configuring Nginx as a reverse proxy for Gitea (HTTP & HTTPS)
To serve Gitea over both HTTP and HTTPS, you can set up an Nginx server block with your own SSL certificate.
1. Create Nginx server block
sudo nano /etc/nginx/conf.d/gitea.confAdd the following:
# HTTP redirect to HTTPS
server {
    listen 80;
    server_name git.examplecorp.io;

    return 301 https://$host$request_uri;
}

# HTTPS server
server {
    listen 443 ssl;
    server_name git.examplecorp.io;

    ssl_certificate /etc/nginx/ssl/gitea.crt;
    ssl_certificate_key /etc/nginx/ssl/gitea.key;

    client_max_body_size 50M;

    location / {
        proxy_pass http://127.0.0.1:3000;
        proxy_set_header Host $host;
        proxy_set_header X-Real-IP $remote_addr;
        proxy_set_header X-Forwarded-For $proxy_add_x_forwarded_for;
        proxy_set_header X-Forwarded-Proto $scheme;
    }
}- Replace
/etc/nginx/ssl/gitea.crtand/etc/nginx/ssl/gitea.keywith the paths to your SSL certificate and key. - Replace
git.examplecorp.iowith your hostname or container IP.
2. Test Nginx configuration
sudo nginx -t- Make sure there are no syntax errors.
3. Enable and start Nginx
sudo systemctl enable --now nginx
sudo systemctl status nginx- HTTP traffic is redirected to HTTPS.
- Gitea is now accessible via
https://git.examplecorp.io.
Choosing a database backend for Gitea
Gitea supports multiple database backends. For small, single-user installations, SQLite is sufficient, but it is not recommended for production due to limited scalability and concurrency. PostgreSQL and MariaDB/MySQL are fully supported and offer robust performance for larger setups.
In this guide, we will use PostgreSQL, which Gitea itself recommends for production environments. MariaDB/MySQL would also be fine, but PostgreSQL is preferred here for its reliability and strong feature set.
1. Prepare PostgreSQL
Install PostgreSQL (example for AlmaLinux 9):
sudo dnf install -y postgresql-server postgresql-contrib
sudo postgresql-setup --initdb
sudo systemctl enable --now postgresql
2. Configure PostgreSQL authentication
Add a dedicated Gitea user and database:
sudo -u postgres psqlInside psql:
CREATE USER gitea WITH PASSWORD 'your_password';
CREATE DATABASE gitea OWNER gitea;
\q
Update PostgreSQL HBA configuration (/var/lib/pgsql/data/pg_hba.conf) to allow MD5 password authentication for the Gitea user:
# Allow local connections with password
local   gitea   gitea   md5
host    gitea   gitea   127.0.0.1/32   md5
host    gitea   gitea   ::1/128        md5
Reload PostgreSQL:
sudo systemctl reload postgresqlBasic configuration of Gitea
After installing Gitea and preparing PostgreSQL, the next step is the initial configuration. This covers connecting to the database, setting up email notifications, and creating an administrative account separate from regular users.
1. Access the web setup
- Open your browser and go to:
https://git.examplecorp.io- You should see the Gitea setup page.
2. Database configuration
- Database Type: PostgreSQL
- Host:
127.0.0.1:5432 - Database Name:
gitea - Username:
gitea - Password: your PostgreSQL password
- Optional Table Prefix: leave blank unless you need it.
Gitea will test the connection and confirm it is working.
3. Administrator account
- Create a separate admin user (different from normal users) to manage repositories, users, and system settings.
- This ensures proper separation of administrative privileges.
4. SMTP / Outgoing email configuration
- Enable email notifications for things like password resets, invitations, and alerts.
- Test sending an email to ensure connectivity.
5. Final steps
- Review all settings.
- Click Install Gitea to initialize the system.
- After installation, log in with the admin account and start creating regular users and repositories.
Updating Gitea
When installed under /opt/gitea, it’s best to backup the existing binary before replacing it:
- Get the current version and store it in a variable:
CURRENT_VERSION=$(/opt/gitea/gitea --version | awk '{print $3}')
echo "Current Gitea version: $CURRENT_VERSION"- Backup the current binary:
sudo cp /opt/gitea/gitea /opt/gitea/gitea_backup_$CURRENT_VERSION- Download the latest binary from Gitea Downloads, replacing
<latest-version>:
wget -O /tmp/gitea https://dl.gitea.io/gitea/<latest-version>/gitea-<latest-version>-linux-amd64- Stop the Gitea service:
sudo systemctl stop gitea- Replace the old binary:
sudo mv /tmp/gitea /opt/gitea/gitea
sudo chmod +x /opt/gitea/gitea
sudo chown gitea:gitea /opt/gitea/gitea- Start the service again:
sudo systemctl start gitea
sudo systemctl status gitea- Verify the update:
/opt/gitea/gitea --version- The previous version binary is safely stored as
/opt/gitea/gitea_backup_<old-version>. - All repositories and configurations remain untouched in
/opt/gitea/dataand/opt/gitea/custom.
Migrating a GitHub repository to Gitea
Instead of using git clone --mirror, you can migrate directly inside Gitea. This approach keeps commit history, branches, and tags, while using a secure GitHub token.
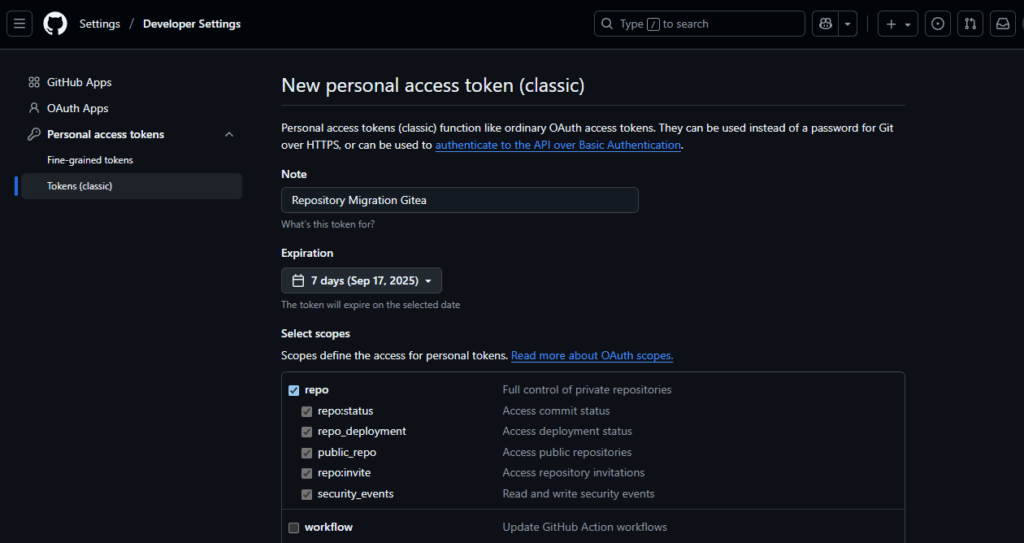
1. Create a GitHub personal access token
- Go to GitHub → Settings → Developer settings → Personal access tokens → Tokens (classic)
- Click Generate new token → Generate new token (classic)
- Create a Note e.g.
Repository Migration Gitea - Select:
repo→ full control of private repositories (needed for migration).
- Copy the generated token and keep it safe.
2. Use Gitea’s migrate repository feature
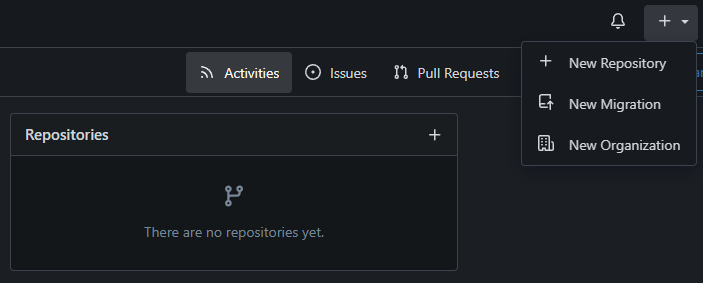
- Log in to your Gitea instance.
- Navigate to New Repository → Migrate Repository.
- Enter the GitHub clone URL:
https://github.com/username/repository.git - Under Authentication, paste your GitHub token.
- Choose:
- Owner → user or organization in Gitea.
- Repository Name → target name in Gitea.
- Check Migrate issues, pull requests, and wiki if needed.
- Click Migrate Repository.
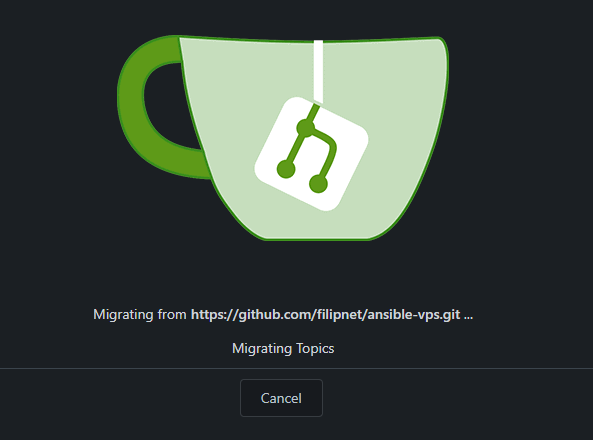
3. Result
- Gitea pulls the full repository including commits, branches, and tags.
- Issues, pull requests, and wiki pages are migrated if selected.
- Ansible Vault secrets remain encrypted – they are just files in Git.
Note: It is recommended to delete the GitHub personal access token right after a successful migration, unless you plan to reuse it for migrating additional repositories.
Using a Gitea personal access token with VS Code
Generate a personal access token in Gitea
- Log in to your Gitea instance in the browser.
- Go to Settings → Applications → Generate New Token.
- Give it a meaningful name (e.g.,
ansible-vscode). - Select All (public, private, and limited)
- Select the required scopes (usually repository is enough for cloning and pushing).
- Select Read and Write access rights
- Click Generate Token and copy it immediately – you won’t see it again later.
Clone the repository via HTTPS with token
Open VS Code and either:
- Option A: Use the built-in Git clone command
- Press
Ctrl+Shift+P→ Git: Clone. - Enter the HTTPS URL with your username and token:
https://<username>:<token>@git.examplecorp.io/smarthome/home-assistant-flows.git - Choose a local folder where VS Code should store the repo.
- Open the repo when prompted.
- Press
- Option B: Use the integrated terminal in VS Code
git clone https://<username>:<token>@git.examplecorp.io/smarthome/home-assistant-flows.git cd home-assistant-flows code .
Backup and maintenance
To ensure your Gitea instance stays safe and reliable, implement the following backup and maintenance procedures:
- Nightly LXC Snapshots – Perform full container snapshots each night. This provides a complete backup of your Gitea environment, including repositories, databases, and configuration.
- PostgreSQL Database Backups – Gitea uses PostgreSQL as its main database. Schedule nightly backups (e.g., at 02:00) using
pg_dump:
#!/bin/bash
BACKUP_DIR="/var/backups/gitea_db"
RETENTION_DAYS=7
TIMESTAMP=$(date +%F_%H-%M-%S)
mkdir -p "$BACKUP_DIR"
pg_dump -U gitea -F c gitea > "$BACKUP_DIR/gitea_$TIMESTAMP.dump"

# Remove old backups
find "$BACKUP_DIR" -type f -name "*.dump" -mtime +$RETENTION_DAYS -delete
This ensures database backups are rotated automatically, keeping only the last 7 days by default.
- Optional Offsite Backup – For extra security, copy LXC snapshots or database backups to an offsite location. This protects against hardware failure or site-wide issues.
- Keep Gitea Updated – Regularly update Gitea to the latest stable version to benefit from security fixes, bug patches, and new features.
With this setup, both your Gitea environment and its database are consistently backed up, maintained, and ready for recovery if needed.
Conclusion
Running Ansible runbooks on my local Gitea instance gives me exactly what I was looking for: full control, digital sovereignty, and safe handling of secrets. The workflow feels instantly familiar – whether in VS Code or on the CLI, it’s just like working with GitHub. Nightly backups add peace of mind, and I can keep GitHub purely for public open-source projects, while Gitea takes care of everything private. This clear separation between public and private projects, along with the secure handling of secrets (even with Ansible Vault), ensures sensitive configurations stay safe at all times.
What truly excites me is how lightweight Gitea is. It barely consumes any system resources and simply runs alongside everything else – no hassle, no overhead. For private repositories, versioning sensitive configurations, or just having peace of mind in my own environment, Gitea has become the perfect fit. I’m genuinely impressed with how seamless the switch was: there’s virtually no learning curve, because Gitea works so much like GitHub.com, only on my own terms.

With Gitea you don’t just get a lightweight self-hosted Git service, but also a full-fledged backup and synchronization option. By mirroring your GitHub repositories into Gitea, you gain redundancy, control, and automatic updates without manual effort.
👉 Learn how to set it up here: https://www.filipnet.de/gitea-github-mirror/