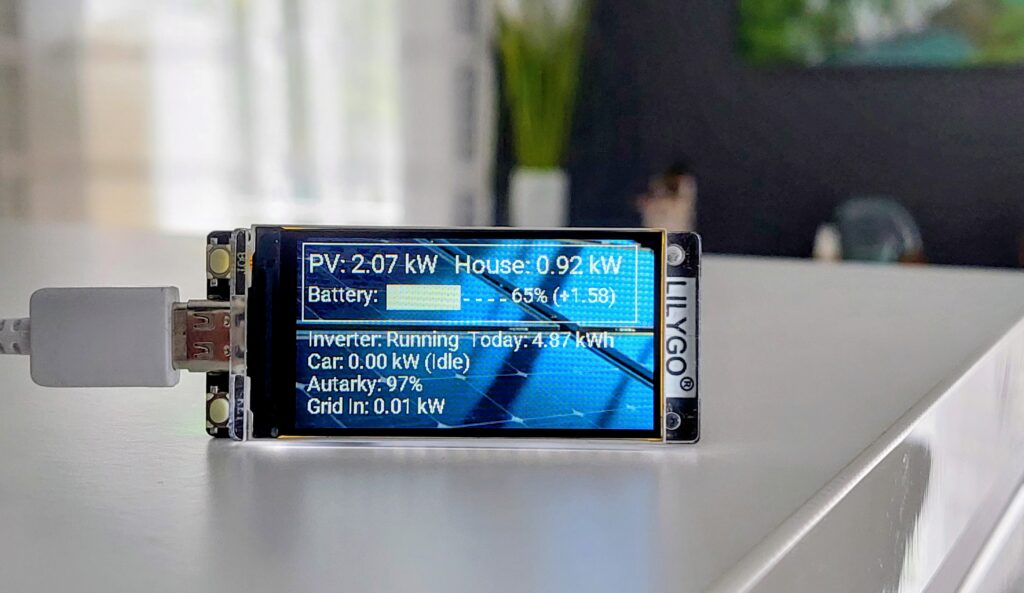
Monitoring your home energy system can be both fascinating and practical. With the LilyGO T-Display S3, an ESP32-S3 microcontroller with a built-in full-color TFT display, you can visualize your solar production, battery status, car charging, and grid consumption in real-time. Using ESPHome to integrate with Home Assistant, this project provides a compact, fully customizable dashboard.
I already have a full dashboard in Home Assistant with Energy Flow, statistics, and all possible values. However, for everyday questions like:
- What is currently coming from the roof?
- How full is the battery?
- Do I have surplus, am I feeding into the grid, and should I start the washing machine?
- What mode is my EV charging in right now?
… opening the website every time is a bit cumbersome. A wall-mounted tablet would be nice, but it consumes power and maintaining a constantly charged battery isn’t ideal. Since I don’t need to interact with the display, the T-Display S3 is a perfect solution.
Many thanks to my colleague Philipp, who brought me the T-Display during a team meeting – this little gesture helped me finally find the perfect use for it in this smart energy dashboard setup.
Note: This project is under continuous development. Code updates and improvements are applied directly here on this page, so it’s worth checking back regularly for the latest changes.
Why the T-Display S3?
The LilyGO T-Display S3 stands out because it combines a bright, full-color TFT display with the processing power of the ESP32-S3. This makes it ideal for:
- Displaying live data in a small, dedicated device.
- Handling multiple sensors via Home Assistant.
- Using Wi-Fi to fetch real-time metrics.
- Adding potential Bluetooth integration for future projects (e.g., car state or devices).
Project overview
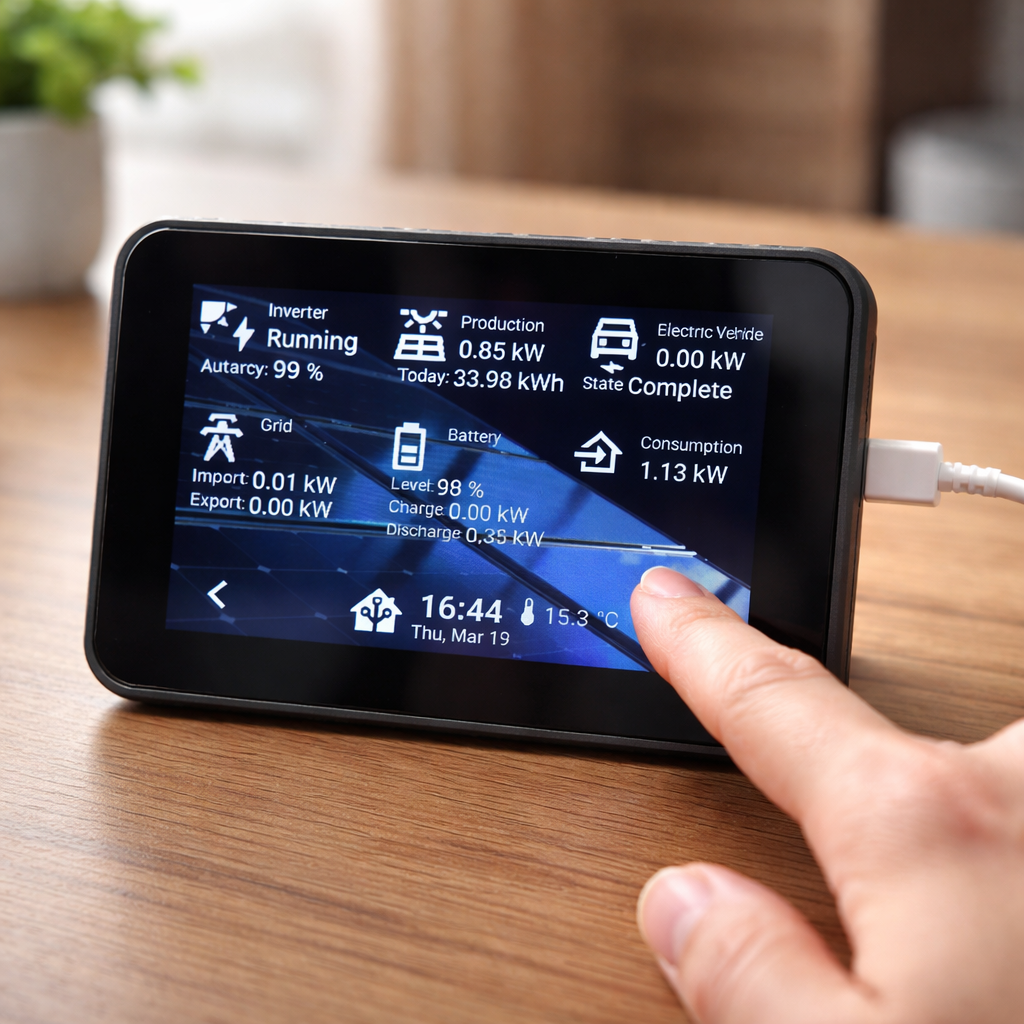
The dashboard displays the following key metrics:
- Solar Production (PV Current): Real-time power from your solar panels.
- Home Consumption: How much energy your household is currently using.
- Autarky Level: Percentage of energy self-sufficiency.
- Battery Status: Charging and discharging power, plus charge percentage.
- Electric Vehicle Status: Charging power and current state (Eco, Grid, Idle).
- Grid Flow: Power imported from or exported to the electricity grid.
All of these metrics are available in Home Assistant, and ESPHome fetches them over the Home Assistant API.
Official Resources and Technical Documentations
If you want to dive deeper into the LilyGO T-Display S3, whether for technical specifications, setup guides, or community projects, here’s a curated list of helpful links:
- Manufacturer’s Page: The official LilyGO site provides full product specifications and purchasing options: LilyGO T-Display S3
- ESPHome Device Documentation: Complete ESPHome integration guide and device overview: ESPHome – LilyGO T-Display S3
- GitHub Repository: Source code, examples, and community contributions: GitHub – T-Display S3
- Pinout & Specs Overview: Detailed layout of pins, display, and peripherals: ESP32 Board Info
Hardware requirements
- LilyGO T-Display S3 (ESP32-S3)
- Micro USB cable for power and flashing
- Access to your Home Assistant instance
- Optional: 3D-printed or custom enclosure for neat placement
Software requirements
- ESPHome installed (either standalone or as a Home Assistant add-on)
- Home Assistant configured with sensors for solar, battery, car, and grid
Data sources queries
This dashboard retrieves and displays key energy metrics from your PV system, battery, household, and grid. Each parameter is updated in real time to give a clear overview of energy flows and status.
| Parameter | Description | Unit | Notes |
|---|---|---|---|
solar_current | Current power output from your PV panels | kW | Shows how much solar energy is being generated at the moment |
house_consumption | Current household power consumption | kW | Indicates how much energy the house is currently using |
grid_import | Power imported from the grid | kW | Only relevant if PV and battery are insufficient |
grid_export | Power exported to the grid | kW | Surplus PV or battery power sent back to the grid |
battery_soc | Battery state of charge | % | Indicates how full the battery is |
battery_charge | Battery charging power | kW | Positive when battery is charging |
battery_discharge | Battery discharging power | kW | Positive when battery is supplying the house or grid |
car_power | Power going to or from an electric vehicle | kW | Optional, shows EV charging or feeding back |
car_state | Electric vehicle status | text | e.g., “Idle”, “Connected”, “Eco” |
autarky_level | Self-sufficiency percentage | % | Portion of household consumption covered by PV + battery |
inverter_status | Current state of the inverter | text | Shows whether the inverter is running, idle, or in error |
solar_today | Solar energy produced today | kWh | Cumulative energy generated by your PV system since midnight |
This table reflects the exact entities currently used in the dashboard, providing a concise overview for anyone implementing or understanding the display.
ESPHome basic configuration
This section covers the basic ESPHome configuration. The entries created by ESPHome during the initial setup should not be overwritten. The following settings are only placeholders for sensitive information (passwords, API keys, etc.) and are highlighted accordingly.
esphome:
  name: esp32-e14c64
  friendly_name: esp32-e14c64

esp32:
  board: esp32-s3-devkitc-1
  framework:
    type: esp-idf
  flash_size: 16MB

# Enable logging
logger:

# Enable Home Assistant API
api:
  encryption:
    key: "YOUR_API_KEY_HERE"

ota:
  - platform: esphome
    password: "YOUR_OTA_PASSWORD_HERE"

wifi:
  ssid: !secret wifi_ssid
  password: "YOUR_WIFI_PASSWORD_HERE"
  use_address: 192.168.1.17

  # Enable fallback hotspot (captive portal) in case wifi connection fails
  ap:
    ssid: "Esp32-E14C64 Fallback Hotspot"
    password: "YOUR_FALLBACK_PASSWORD_HERE"

captive_portal:

time:
  - platform: sntp
    id: time_ntp
    timezone: Europe/Berlin
    servers: 192.168.1.1

output:
  - platform: ledc
    frequency: 2000
    pin: GPIO38
    id: backlight_output

light:
  - platform: monochromatic
    output: backlight_output
    name: LCD Backlight
    id: led
    restore_mode: ALWAYS_ON
    default_transition_length: 0s

spi:
  type: octal
  clk_pin: 8
  data_pins:
    - 39
    - 40
    - 41
    - 42
    - ignore_strapping_warning: true
      number: 45
    - ignore_strapping_warning: true
      number: 46
    - 47
    - 48

psram:
  speed: 80MHz
  mode: octal

font:
  - file: "gfonts://Roboto"
    id: default_font
    size: 18
  - file: "gfonts://Roboto"
    id: big_font
    size: 22
  - file: "gfonts://Noto+Sans+Mono"
    id: symbols_font
    size: 18
    glyphs:
      - "█-"

image:
  - file: "images/background.png"
    id: background
    type: RGB565
    resize: 320x170
Notes / Highlights
- Fonts & Images: Google Fonts (
Roboto) for default and large text. Background image preloaded and resized to display resolution. - ESP32 board selection: Using
esp32-s3-devkitc-1with ESP-IDF framework and 16 MB flash for more complex features. - Logging & API: Logger enabled for debugging; Home Assistant API with encryption key ensures secure communication.
- OTA & Wi-Fi: Passwords are anonymized; fallback AP allows connection if main Wi‑Fi fails. Static IP set with
use_address. - Time: SNTP server points to local router; timezone is Europe/Berlin.
- Outputs & Backlight: PWM LEDC for LCD backlight, restore mode ensures backlight state after reboot.
- SPI & PSRAM: Octal SPI bus with PSRAM support allows fast access to large images/fonts.
- Backlight dimming: Time-based control allows the display to automatically reduce brightness at night (e.g. 10 % between 23:30 and 05:30) for comfortable readability in darkness and full brightness during the day.
ESPHome sensor configuration
This section defines all the sensors used in the system. The ids assigned here are especially important, as they are referenced later in the display block to show live values on the screen.
sensor:
  - platform: wifi_signal
    name: "Wi-Fi Signal Strength"
    id: wifi_signal_strength
    update_interval: 60s
    unit_of_measurement: "dBm"
    accuracy_decimals: 0

  - platform: uptime
    name: "System Uptime"
    id: system_uptime
    unit_of_measurement: "s"
    accuracy_decimals: 0

  - platform: homeassistant
    id: solar_current
    entity_id: sensor.pv_production
    unit_of_measurement: "W"
    accuracy_decimals: 2

  - platform: homeassistant
    id: house_consumption
    entity_id: sensor.house_consumption
    unit_of_measurement: "kW"
    accuracy_decimals: 2

  - platform: homeassistant
    id: autarky_level
    entity_id: sensor.energy_autarky
    unit_of_measurement: "%"
    accuracy_decimals: 0

  - platform: homeassistant
    id: battery_soc
    entity_id: sensor.battery_soc
    unit_of_measurement: "%"
    accuracy_decimals: 0

  - platform: homeassistant
    id: battery_charge
    entity_id: sensor.battery_charge_power
    unit_of_measurement: "W"
    accuracy_decimals: 2

  - platform: homeassistant
    id: battery_discharge
    entity_id: sensor.battery_discharge_power
    unit_of_measurement: "W"
    accuracy_decimals: 2

  - platform: homeassistant
    id: car_power
    entity_id: sensor.ev_charge_power
    unit_of_measurement: "W"
    accuracy_decimals: 2

  - platform: homeassistant
    id: grid_import
    entity_id: sensor.grid_import_power
    unit_of_measurement: "W"
    accuracy_decimals: 2

  - platform: homeassistant
    id: grid_export
    entity_id: sensor.grid_export_power
    unit_of_measurement: "W"
    accuracy_decimals: 2

  - platform: homeassistant
    id: solar_today
    entity_id: sensor.energy_solar_today
    unit_of_measurement: "kWh"
    accuracy_decimals: 2

text_sensor:
  - platform: homeassistant
    id: car_state
    entity_id: sensor.ev_charge_state
Notes / Highlights
- Wi-Fi & Uptime: Device-level metrics for monitoring and debugging.
- Generic Home Assistant Sensors
- Entity IDs: Fully anonymized and neutral; no reference to personal devices, brands, or locations.
- Decimals: Configured per sensor for clean display without excessive precision.
ESPHome display configuration
The display configuration is the most challenging part of this setup, as it requires carefully positioning each value so that all information is both visually appealing and easy to read at a glance.
display:
  - platform: mipi_spi
    model: t-display-s3
    rotation: 270
    lambda: |-
      int left_x = 10;
      int top_y = 10;
      int y = top_y;

      int frame_width = 300;
      int frame_height = 70;

      // Draw background image
      it.image(0, 0, id(background));

      // Draw frame around PV, House, and Battery
      it.rectangle(left_x - 5, top_y - 5, frame_width, frame_height);

      // PV top left
      float pv_val = isnan(id(solar_current).state) ? 0.0 : id(solar_current).state / 1000.0;
      it.printf(left_x, y, id(big_font), "PV: %.2f kW", pv_val);

      // House top right, fallback to grid import only if house consumption < 50 W
      float house_kw = isnan(id(house_consumption).state) ? 0.0 : id(house_consumption).state;
      float grid_kw = isnan(id(grid_import).state) ? 0.0 : id(grid_import).state / 1000.0;
      float house_value = (house_kw < 0.05) ? grid_kw : house_kw + grid_kw;

      // Adjust x-position to keep text inside frame
      int house_x = left_x + frame_width / 2 - 20; // 20 px padding for big_font
      it.printf(house_x, y, id(big_font), "House: %.2f kW", house_value);
      y += 30;

      // Battery line with block graphics
      int soc = isnan(id(battery_soc).state) ? 0 : (int) id(battery_soc).state;
      int max_bars = 10;  // 10 characters
      int bars = soc * max_bars / 100;

      // Build the bar string
      std::string bar_str = "";
      for (int i = 0; i < bars; i++) bar_str += "█";
      for (int i = bars; i < max_bars; i++) bar_str += "-";

      // Calculate battery power (+ for charge, - for discharge)
      float batt_power = 0.0;
      if (!isnan(id(battery_charge).state)) batt_power += id(battery_charge).state;
      if (!isnan(id(battery_discharge).state)) batt_power -= id(battery_discharge).state;

      // Fixed X positions
      int x_label = left_x;        // "Battery: "
      int x_bars  = x_label + 70;  // adjust offset for 1 space
      int x_value = x_bars + 10;   // start value 2 spaces after bars (default_font)

      // Print
      it.printf(x_label, y, id(default_font), "Battery: "); // 1 space after label
      it.printf(x_bars, y, id(symbols_font), "%s", bar_str.c_str());  // only bars
      it.printf(x_bars + 100, y, id(default_font), "  %3d%% (%+.2f)  ", soc, batt_power / 1000.0); // default_font + 2 spaces before

      y += 40;

      // Inverter status + PV Today
      if (id(inverter_status).has_state()) {
        std::string inv_str = id(inverter_status).state;  // inverter state
        float pv_today_value = isnan(id(solar_today).state) ? 0.0 : id(solar_today).state; // daily production in kWh
        it.printf(left_x, y, id(default_font), "Inverter: %s  Today: %.2f kWh", inv_str.c_str(), pv_today_value);
        y += 20;
      }

      // Car with state in brackets
      if (!isnan(id(car_power).state)) {
        if (id(car_state).has_state())
          it.printf(left_x, y, id(default_font), "Car: %.2f kW (%s)", id(car_power).state / 1000.0, id(car_state).state.c_str());
        else
          it.printf(left_x, y, id(default_font), "Car: %.2f kW", id(car_power).state / 1000.0);
      }
      y += 20;

      // Autarky
      if (!isnan(id(autarky_level).state)) {
        it.printf(left_x, y, id(default_font), "Autarky: %.0f%%", id(autarky_level).state);
      }
      y += 20;

      // Grid In / Out
      if (!isnan(id(grid_import).state) && id(grid_import).state > 0.0) {
        it.printf(left_x, y, id(default_font), "Grid In: %.2f kW", id(grid_import).state / 1000.0);
      } else if (!isnan(id(grid_export).state) && id(grid_export).state > 0.0) {
        it.printf(left_x, y, id(default_font), "Grid Out: %.2f kW", id(grid_export).state / 1000.0);
      }
Notes / Highlights
- IDs only: The display logic references
id:of sensors, not their Home Assistantentity_ids. This keeps the display code independent and flexible. - PV & House: PV production is displayed left; House consumption right. If House consumption is very low (<50 W), fallback to grid import is used.
- Battery:
- SOC represented as percentage plus simple bar chart inside the frame.
- Battery power is shown as positive (charging) or negative (discharging), scaled to kW.
Battery: ----------   0% (+0.00)
Battery: ██--------  25% (-0.12)
Battery: █████-----  50% (+0.35)
Battery: ████████--  75% (-0.18)
Battery: ██████████ 100% (+0.80)- Car / EV: Shows power and optional state text from
car_state. - Autarky: Self-sufficiency percentage displayed below the frame.
- Grid: Either
Grid In(import) orGrid Out(export) shown dynamically depending on values. - Layout: Coordinates (
left_x,top_y) and frame (frame_width,frame_height) used for structured visual alignment.
Final thoughts
This setup turns a simple ESP32-S3 board into a dedicated smart energy dashboard, giving you live insight into your home’s energy flows and EV charging — all in a neat, self-contained device.
Additional Information
During this project, I encountered several challenges and obstacles that required careful consideration and problem-solving. In the following sections, I will walk you through each of these hurdles, explaining how they arose and how I addressed them. By sharing these experiences, I hope to provide useful insights for anyone tackling similar projects.
Create a daily energy sensor
- Open Home Assistant GUI.
- Navigate to Settings → Devices & Services → Helpers.
- Click “Add Helper”.
- Choose the type “Utility Meter” (sometimes shown as “Energy” or “Counter” depending on HA version).
- Fill in the fields:
- Name:
solar_today - Source: select your continuous energy sensor, e.g.,
sensor.solar_energy_total - Cycle: choose Daily
- Unit of Measurement:
kWh
- Name:
- Click Create.
Adding a custom background to your LilyGO T-Display S3 in ESPHome

You can make your T-Display S3 dashboards look professional by adding a custom background image behind your labels, bars, and other elements. Here’s how to do it.
1. Prepare Your Background Image
- Rotate your image to 320×170 px (landscape).
- Use dark tones to maximize contrast for white overlay text.
- Include details like diagonal solar panels with a blue shimmer for a modern look.
- Optional: render at higher resolution (e.g., 1280×680 px) and downscale for better detail.
| Parameter | Value |
|---|---|
| Display resolution | 320 × 170 px |
| Recommended render size | 1280 × 680 px (4×) |
| File format | PNG |
| Color format | RGB565 |
2. Add the Image to ESPHome
Place the image in the files/ folder of your ESPHome project:
my_esphome_project/
├── my_device.yaml
└── images/
    └── background.png
3. Declare the Image in ESPHome
image:
  - file: "images/background.png"
    id: background
    type: RGB565
    resize: 320x170
4. Display the Image
Draw the background first in your display: lambda so all widgets appear on top:
display:
  - platform: mipi_spi
    model: t-display-s3
    rotation: 270
    lambda: |-
      it.image(0, 0, id(background));
      // Example: draw overlay text
      it.printf(10, 10, id(default_font), "PV: %.2f kW", id(solar_current).state / 1000.0);
Resetting the LilyGO T-Display S3
To fully reset the LilyGO T-Display S3 to factory defaults:
- Press and hold the BOOT button on the board.
- While keeping BOOT pressed, press and release the RESET button once.
- Release the BOOT button.
This sequence triggers a full reset, clearing user settings and returning the device to its default state.